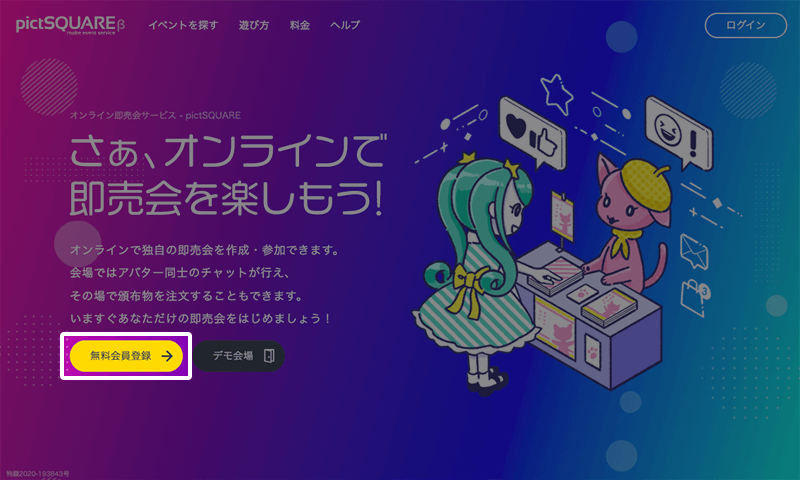
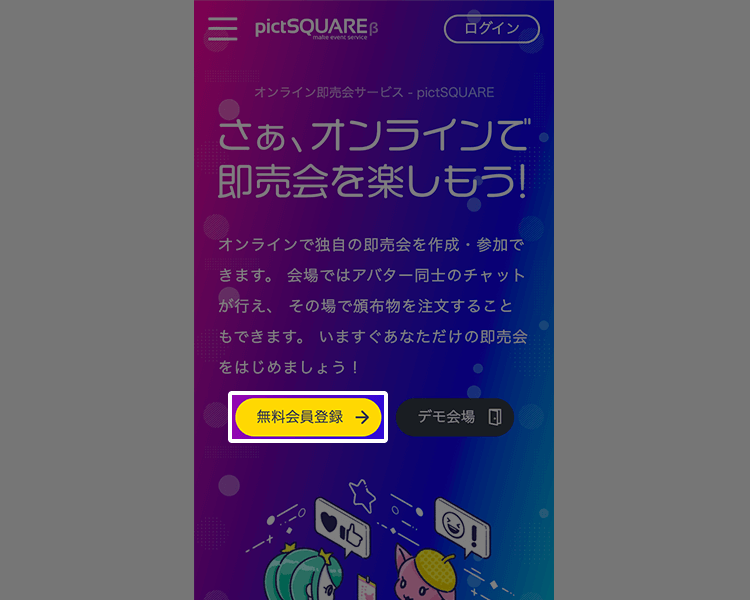
How to use
pictSQUARE is a virtual space.
It's a service where you can have a doujin exhibition sale.
Find out how to use it below.
Circle participation is also required when Event Organizers want to exhibit.
- STEP1 Membership registration
-
-
 Entering membership information
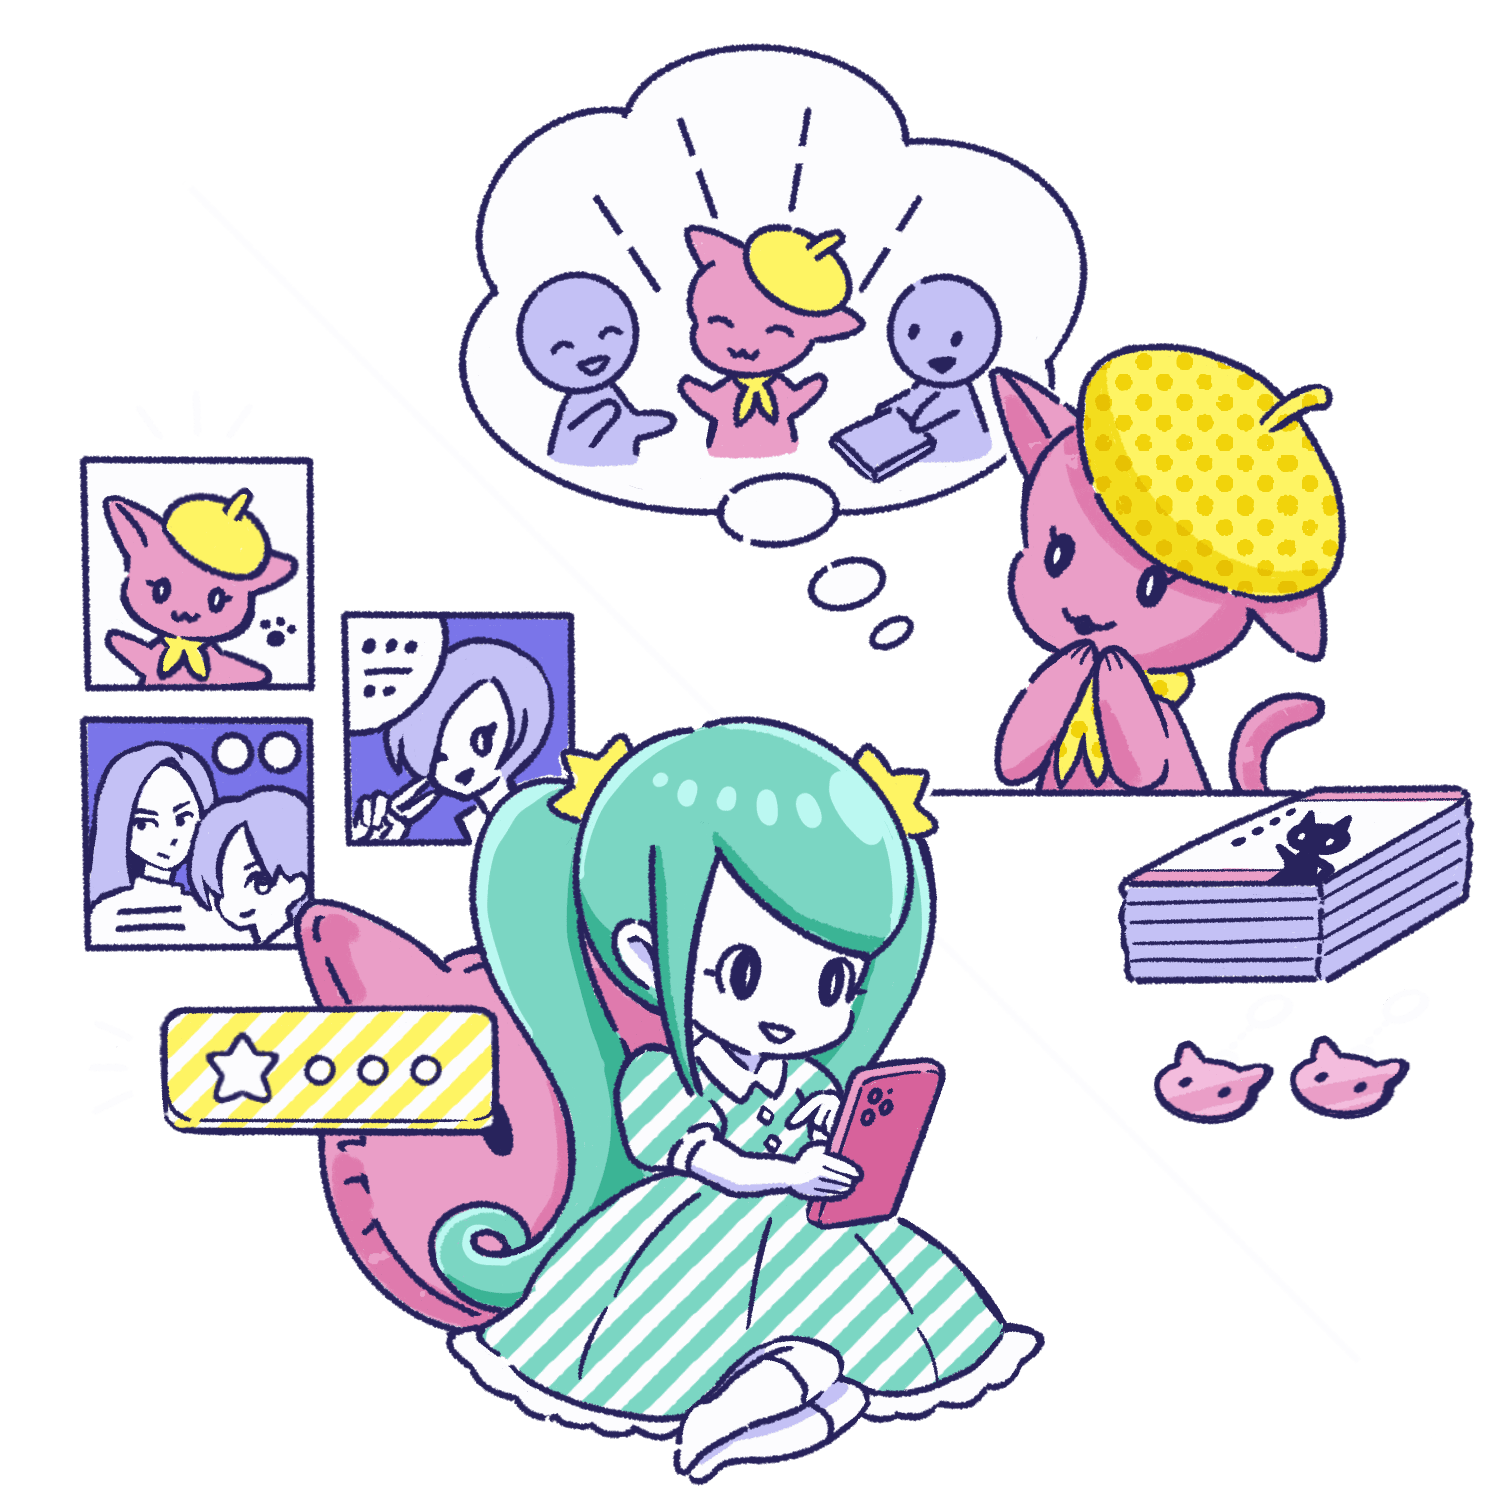
To get started, create an account by entering the required information on the new member registration page.
-
- STEP2 Prepare stores (such as online store sites)
-
-
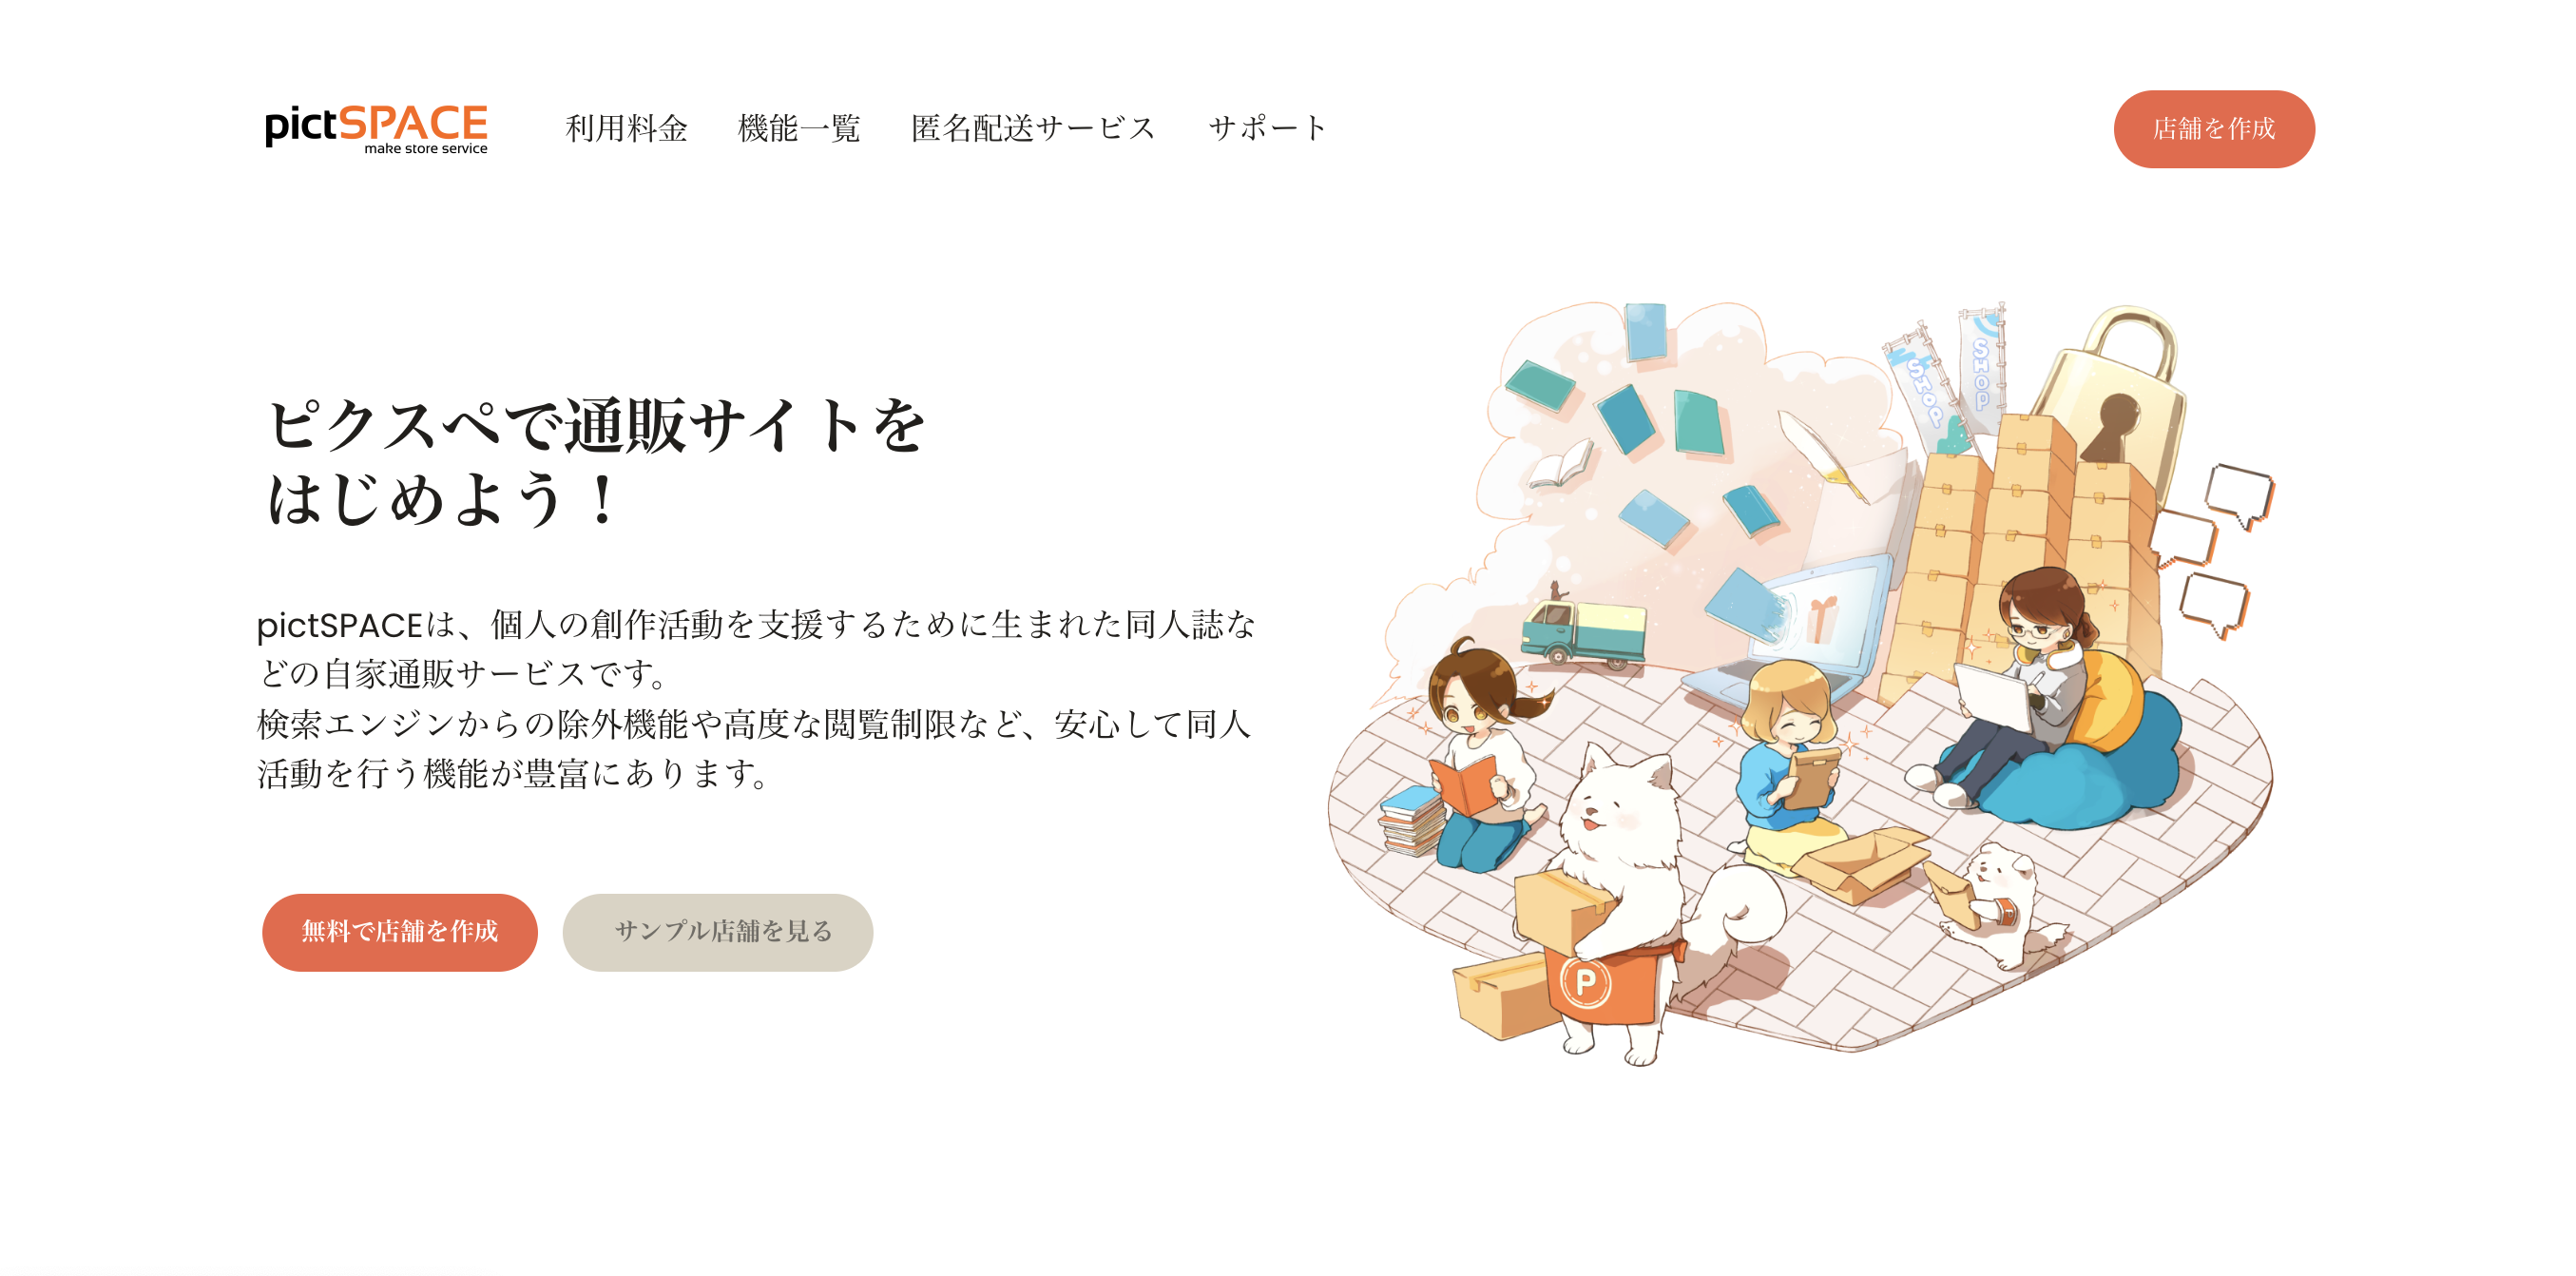
 Preparing for online stores
To facilitate sales, preparation of an e-commerce service is required. By using pictSPACE, buyers can smoothly purchase products within the venue.
Participation can also be done using your own profile URL or X link. -
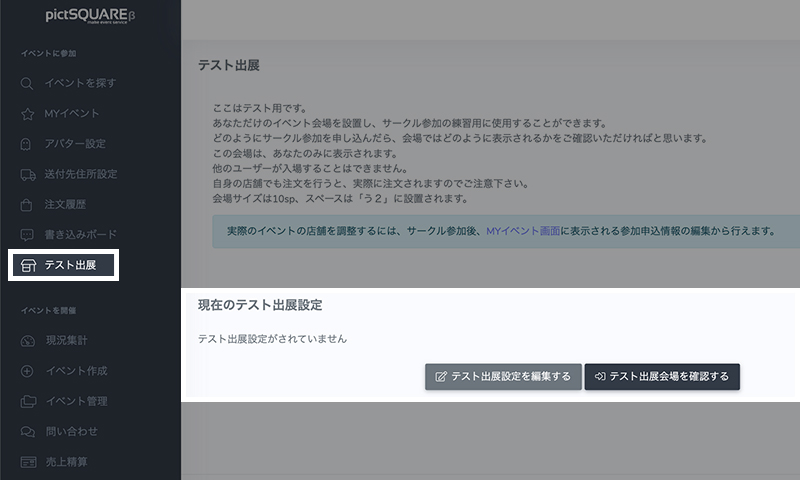
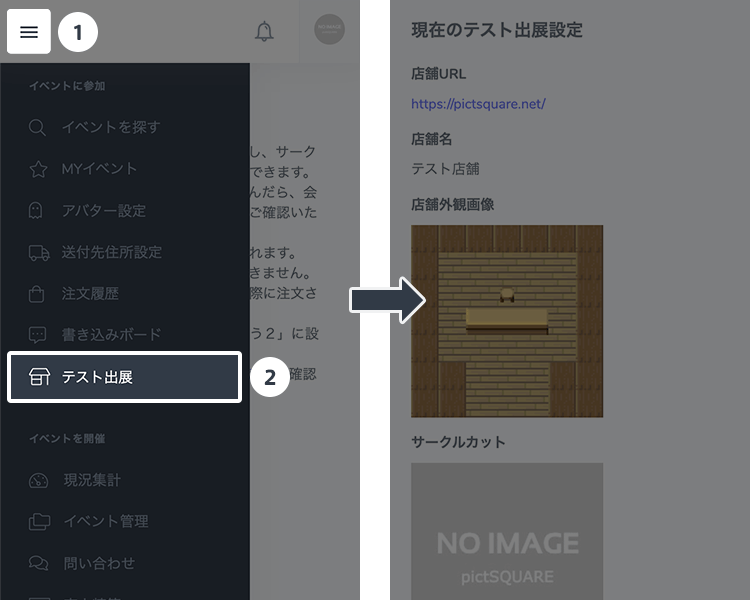 Test exhibit
You can check your store's exterior and online shopping settings in advance. The contents of the test exhibit are invisible to other users.
In addition, when participating in the actual Event, you can use the "after-hours admission" function to set up and check the store before the Event starts.
-
- STEP3 Sign up for an Event
-
-
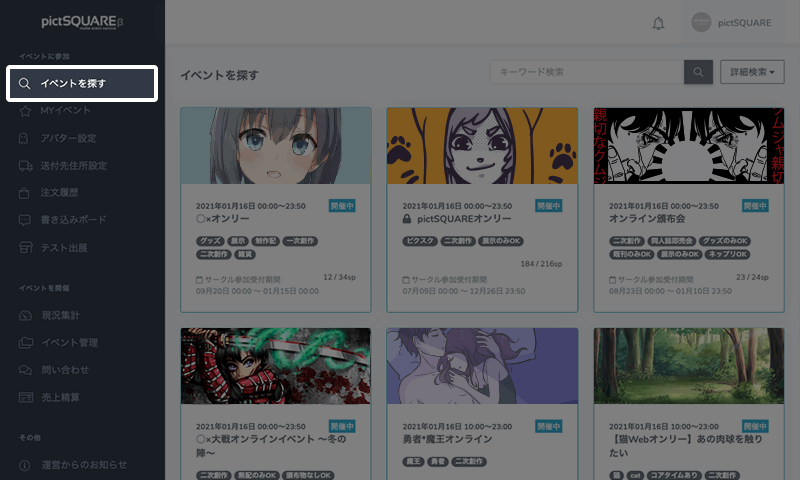
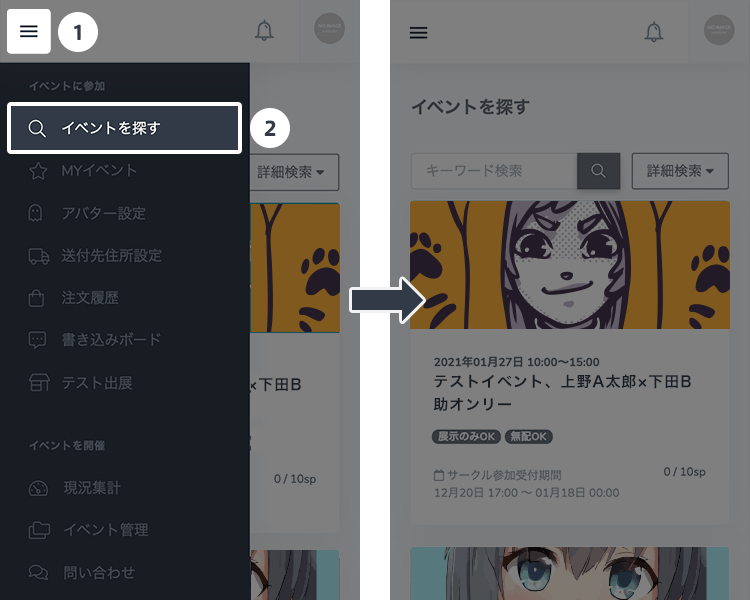 Find Events to attend
Head to "Find Events" on your dashboard to find the Event you want to attend.
Events can also be found on the front page of pictSQUARE. -
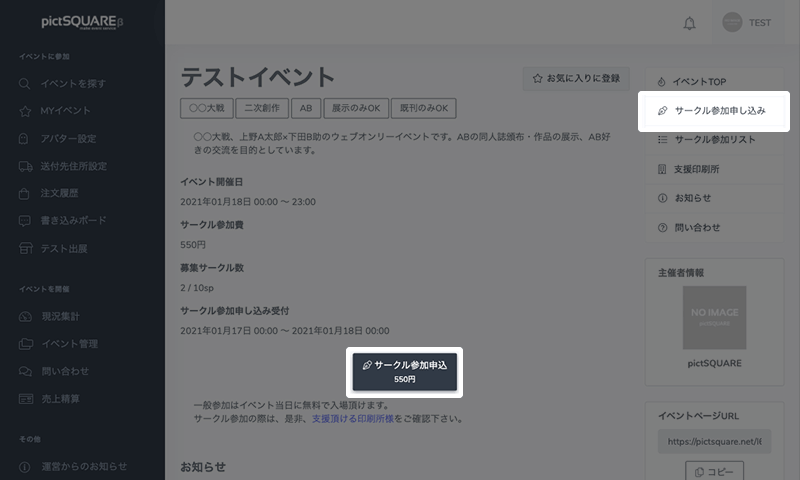
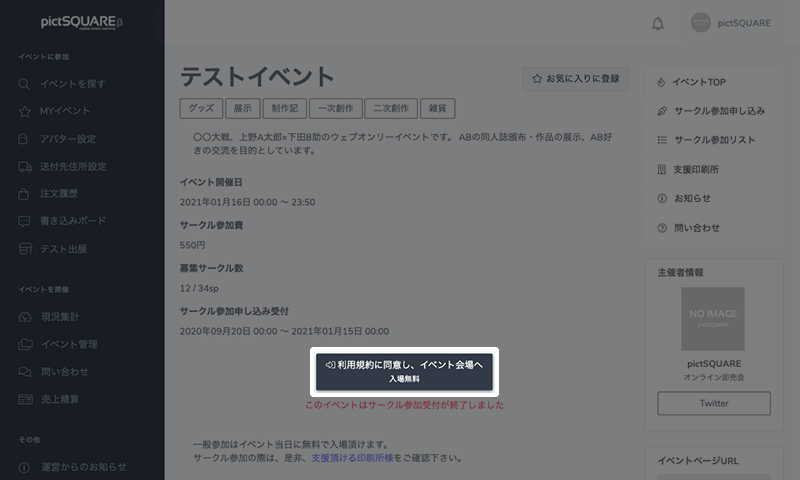
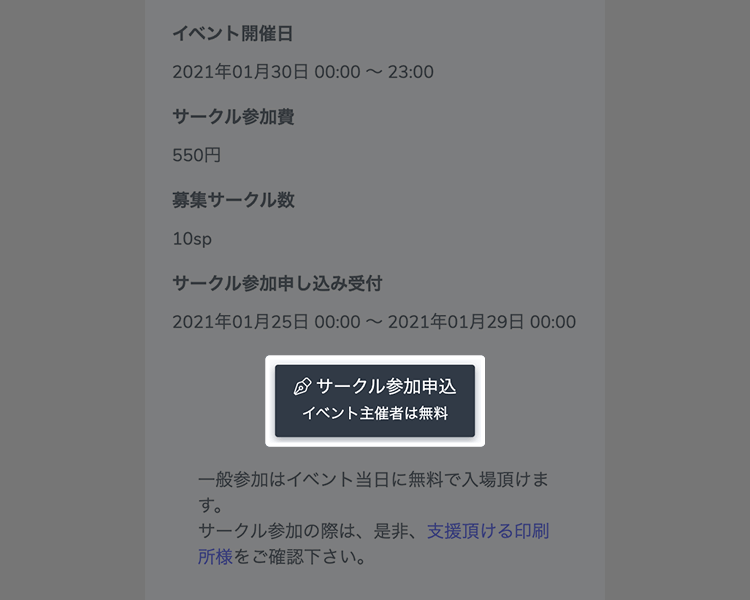 Application to participate
After checking the details of the Event and the Circle participation fee on the Event details page, click the "Apply for Circle participation" button to apply for Circle participation.
-
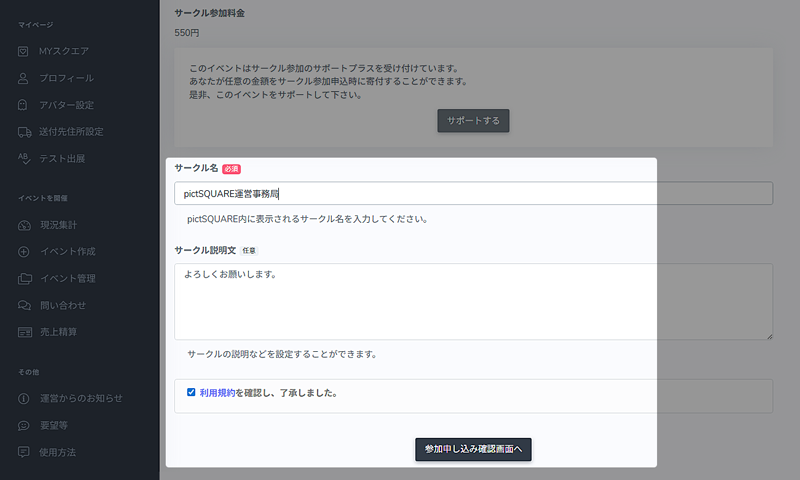
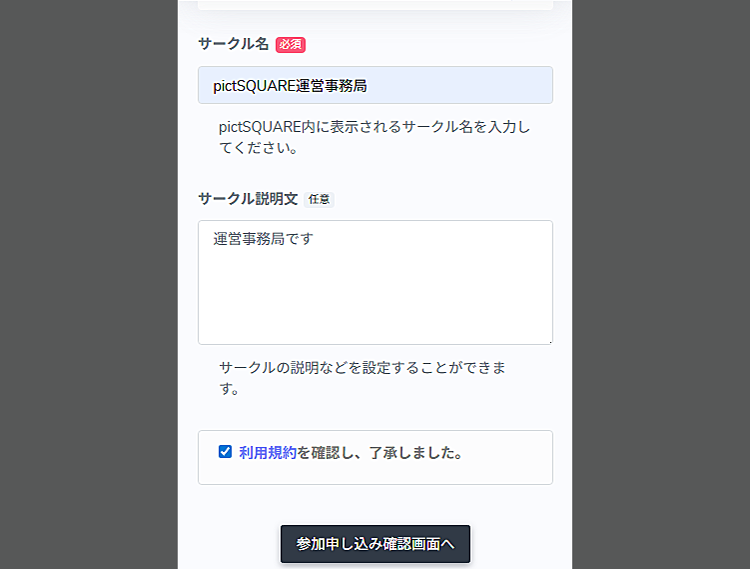 Entering application information
Enter the required information on the input screen.
- Circle name
- Circle description
Review and agree to the terms, then click "Go to the application page." -
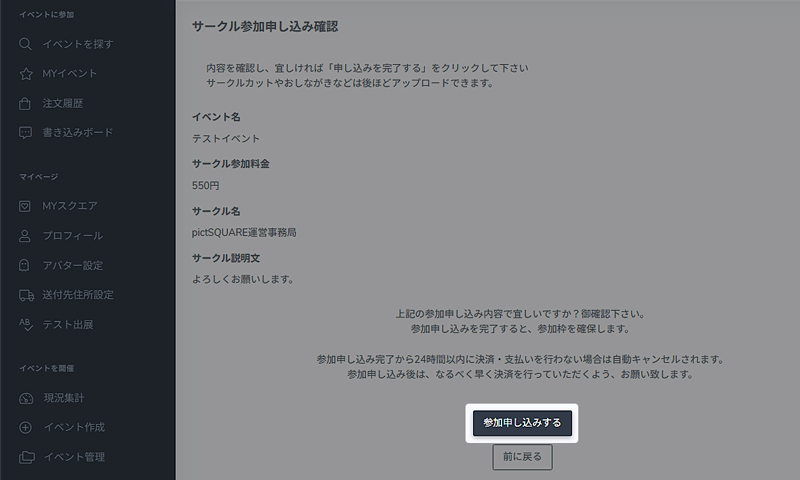
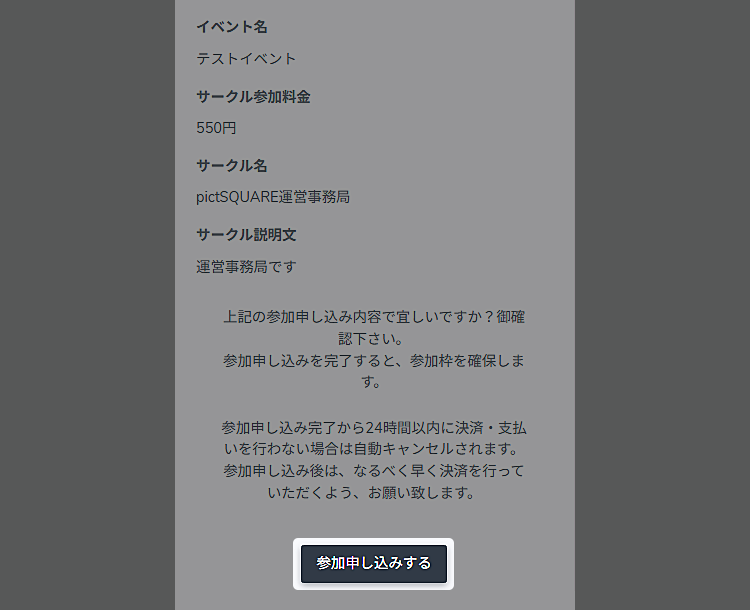 Review your application
Review the entered information, then click "Submit participation application."
You can change this setting at any time. -
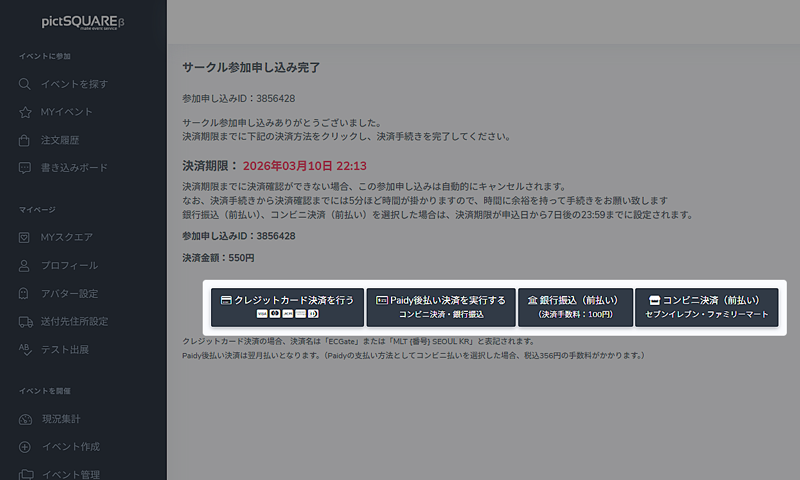
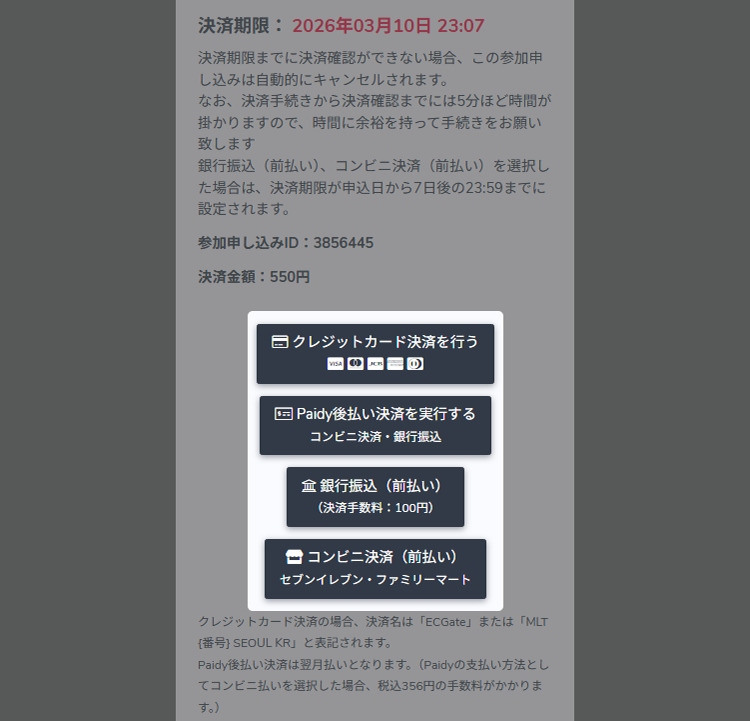 Pay the circle participation fee
Pay the circle participation fee.
The amount varies by event.
You can pay by credit card, Paidy postpaid, bank transfer, or convenience store payment.
-
- STEP4 Preparations before the Event
-
-
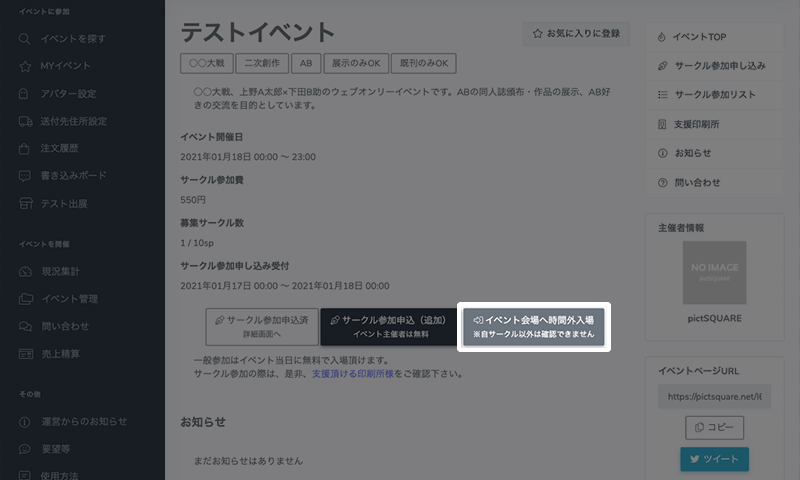
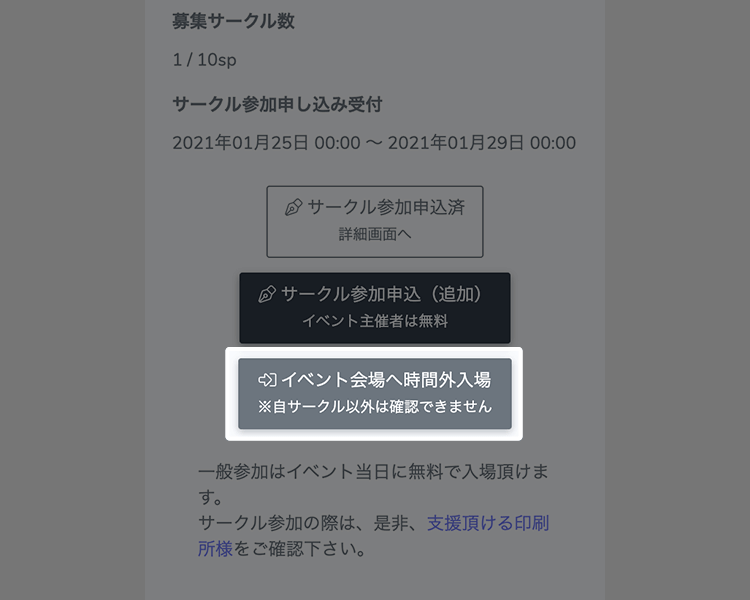 After-hours admission
After applying for Circle participation, you can enter with "after-hours admission" for advance preparation before the Event starts. Check your store's exterior and online shopping settings in advance.
After-hours admission is available anytime from the time of application to the start of the Event.You cannot check the Distributions of other stores. -
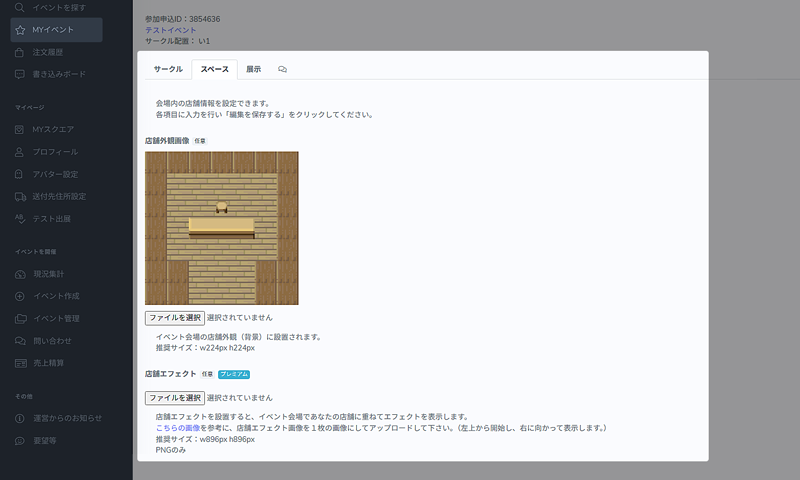
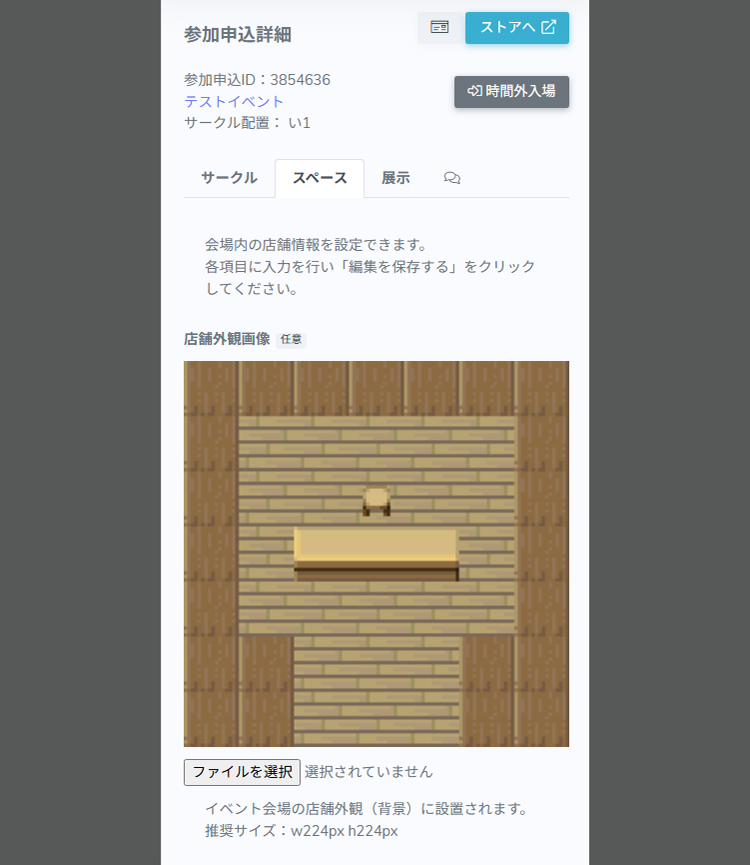 Store settings
Configure circle-related settings such as store appearance, circle cut, item list, and message board placement.
Store settings can be edited from MY Event > "Application details" of the applicable Event. -
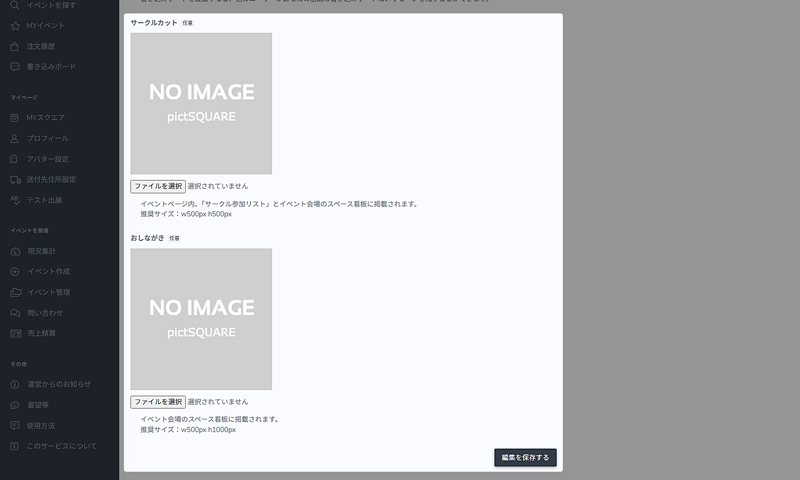
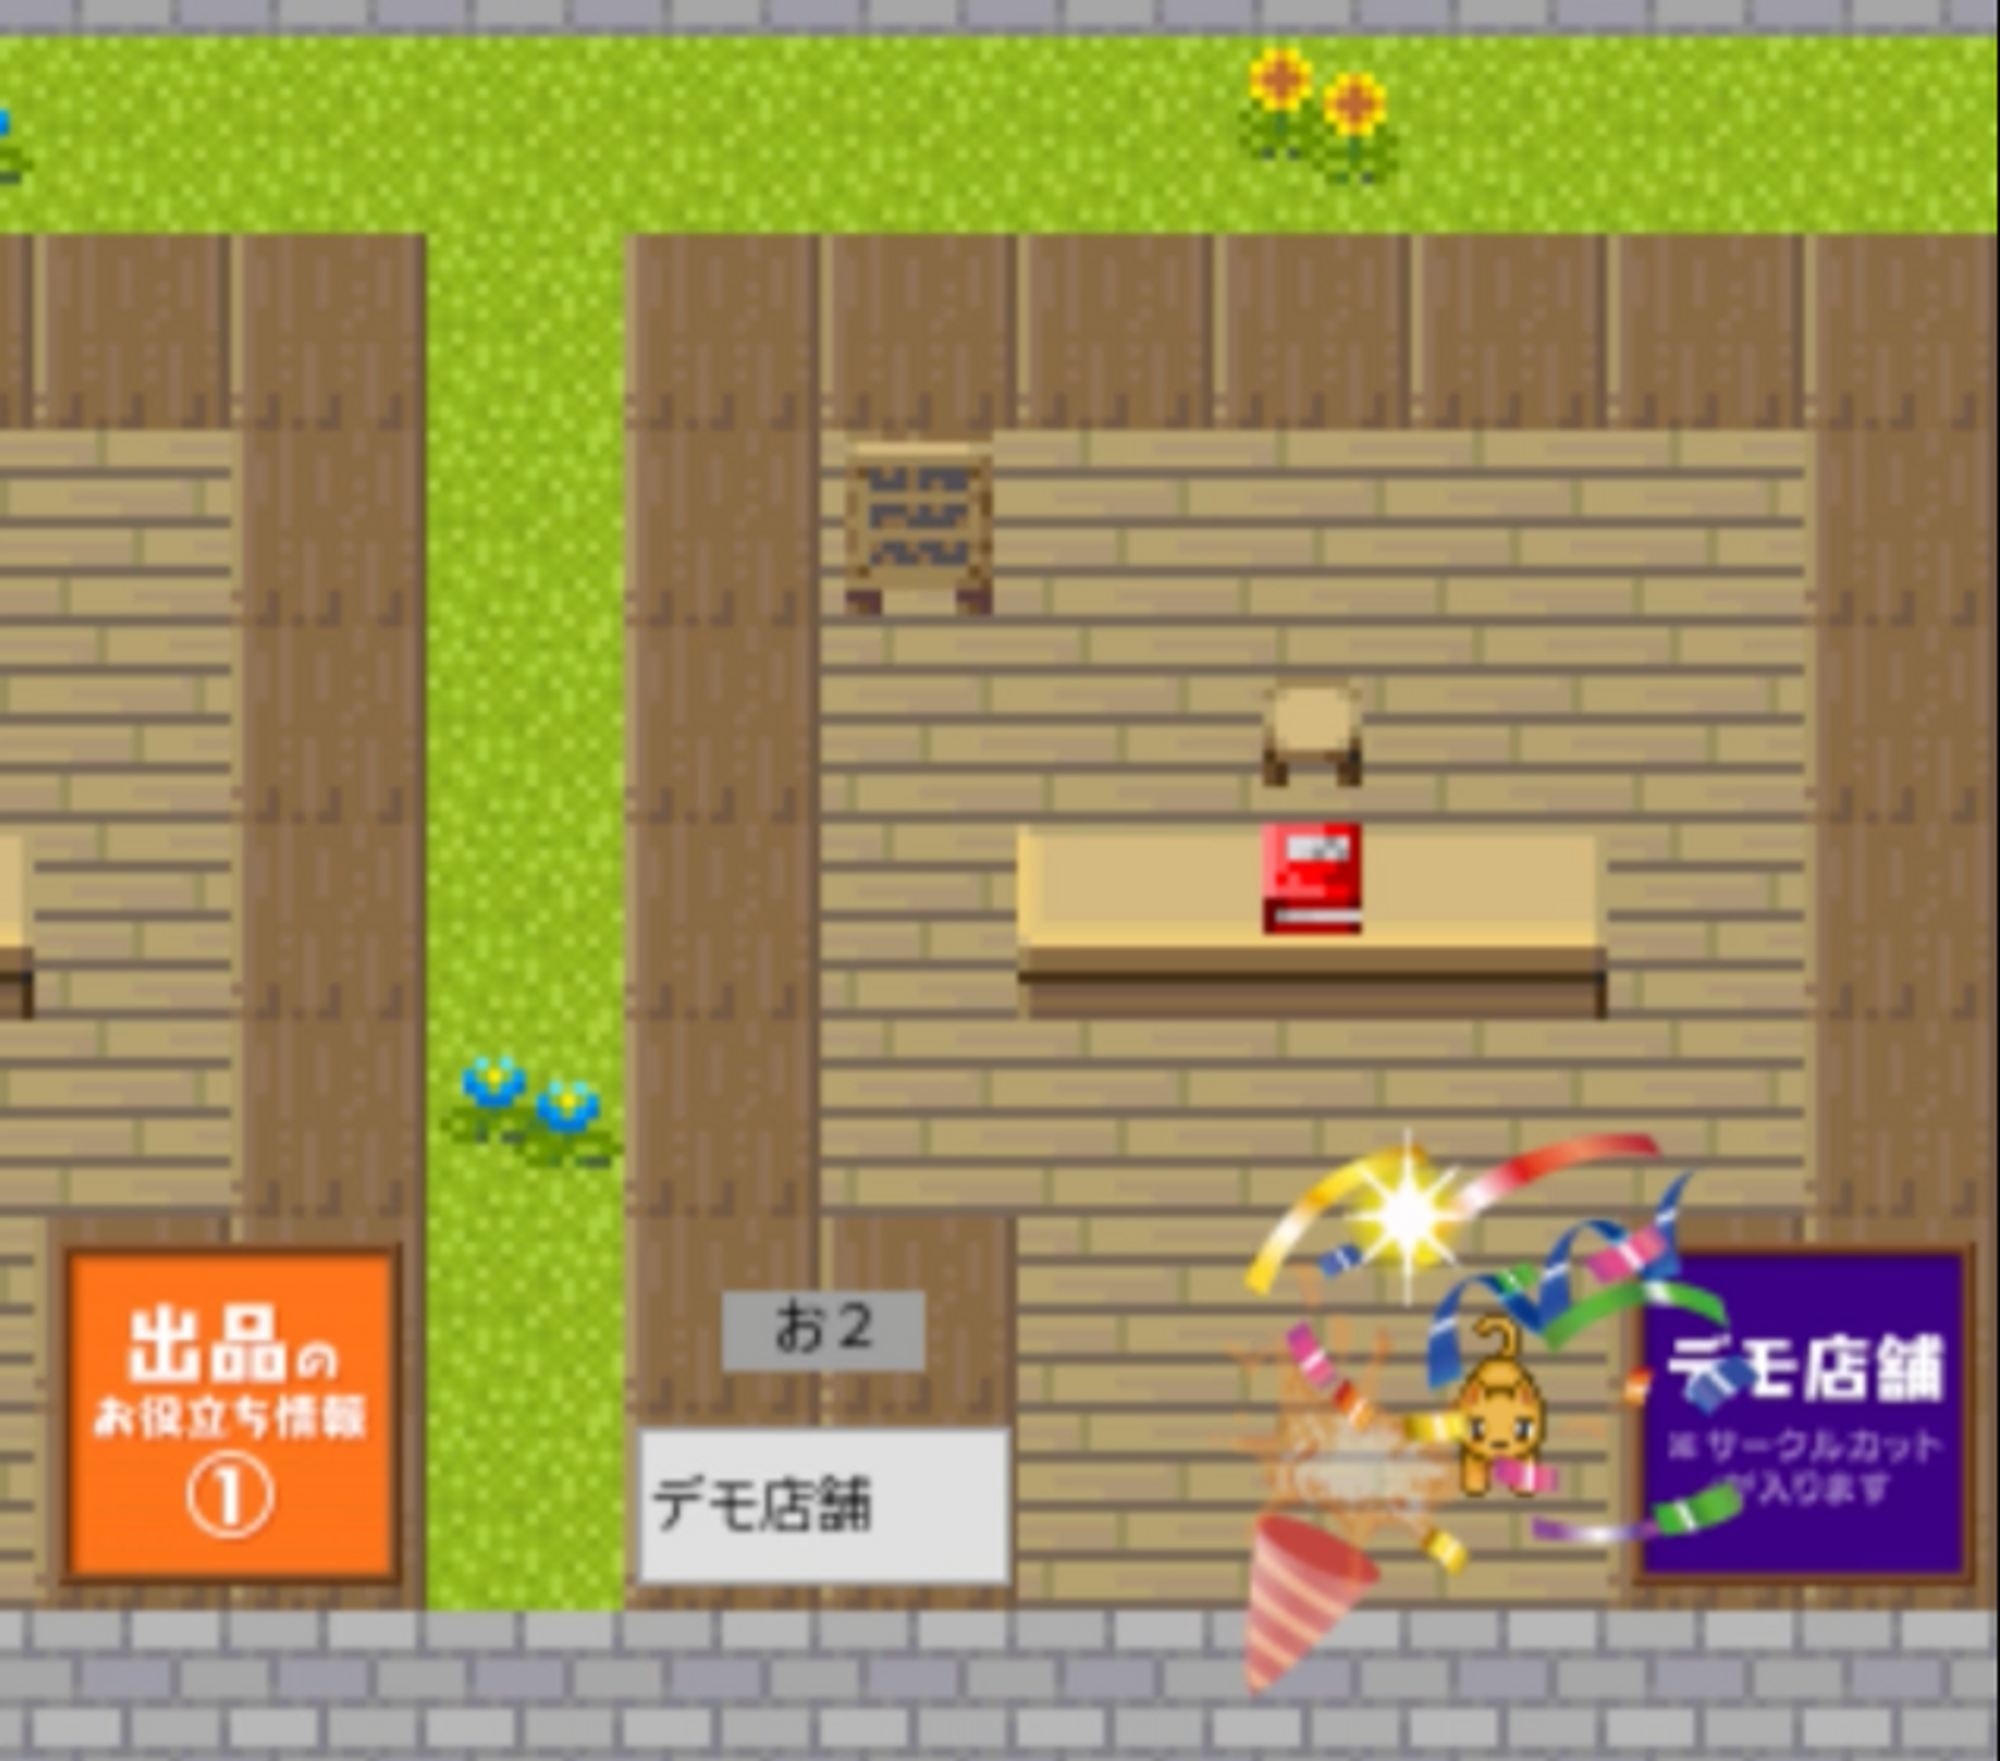
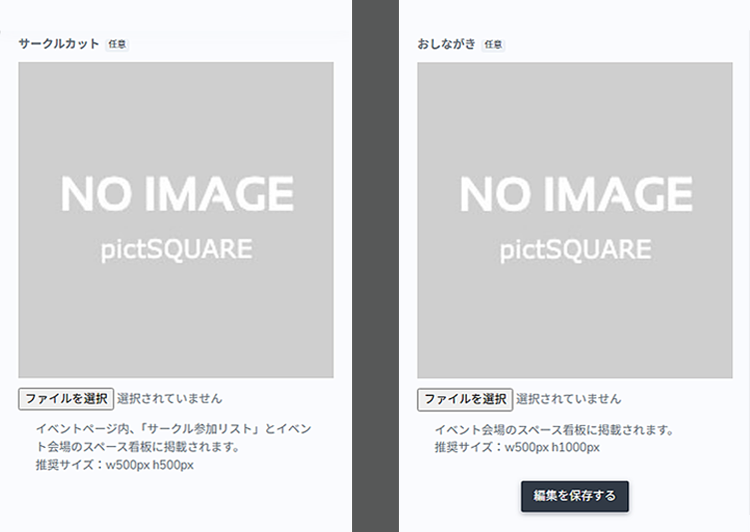 Set the circle cut and item list
The circle cut appears on the event page's Circle Participation List and on the venue space sign.
The item list appears on the venue space sign.
Prepare images that help showcase your circle.You can edit the circle cut and item list from My Events > the relevant event > Application Details > Space tab. -
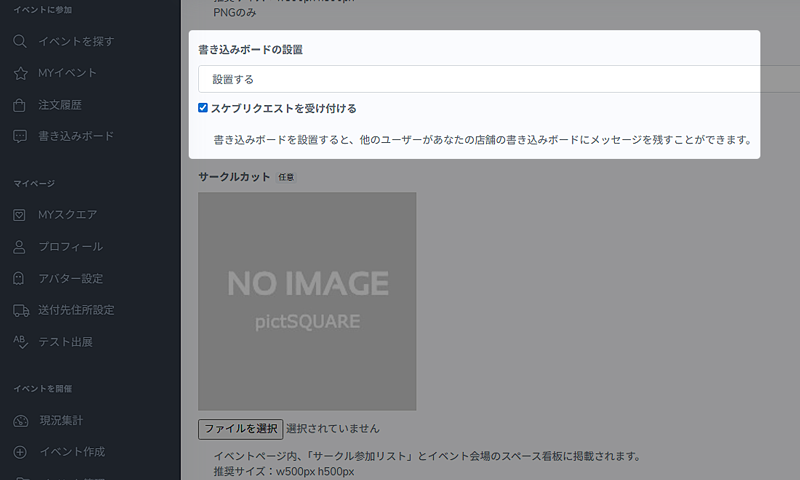
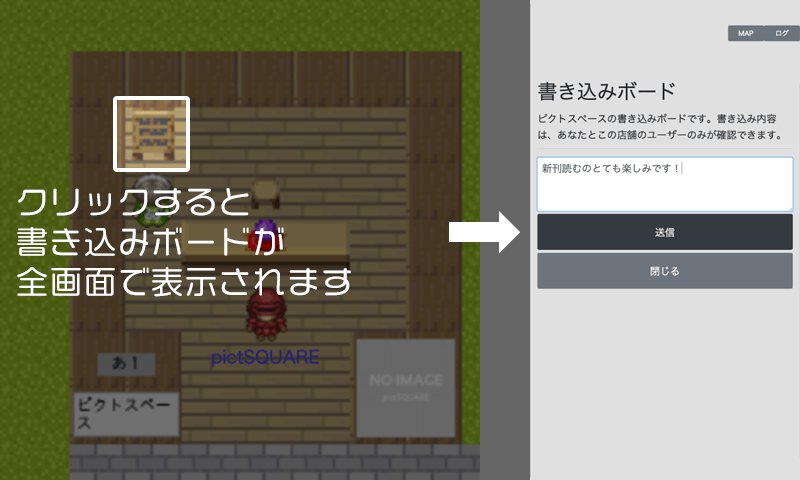
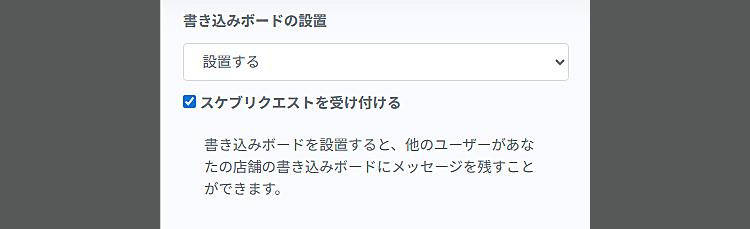 Message board and sketch requests
Choose whether to set up a message board.
With a message board, visitors to your circle can send you direct messages.
If sketch requests are enabled, visitors can send you sketch commissions.Message board settings can be edited from My Events > the relevant event > Application Details > Space tab. -
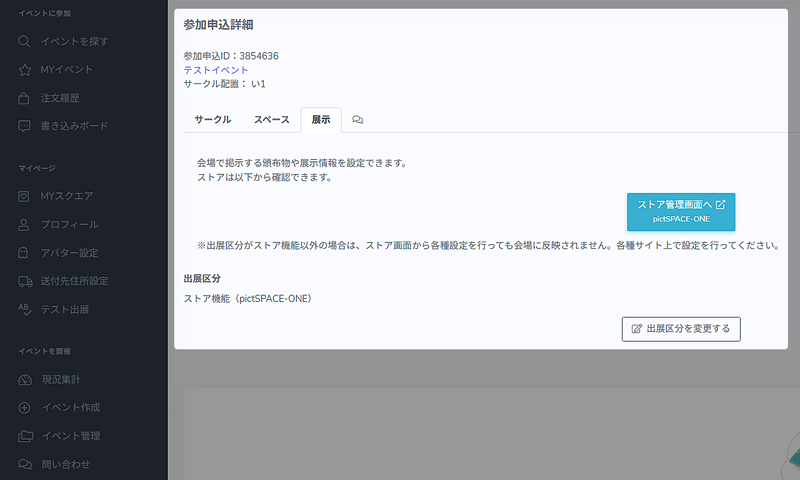
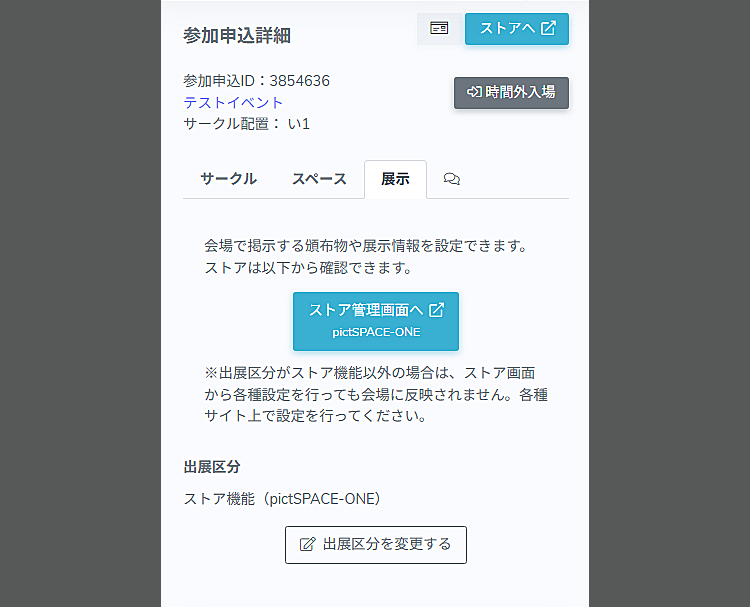 Set exhibition content
You can configure how your circle is exhibited.
Use the "Change exhibition category" button to choose the exhibition style you want.Exhibition settings can be edited from My Events > the relevant event > Application Details > Exhibition tab. -
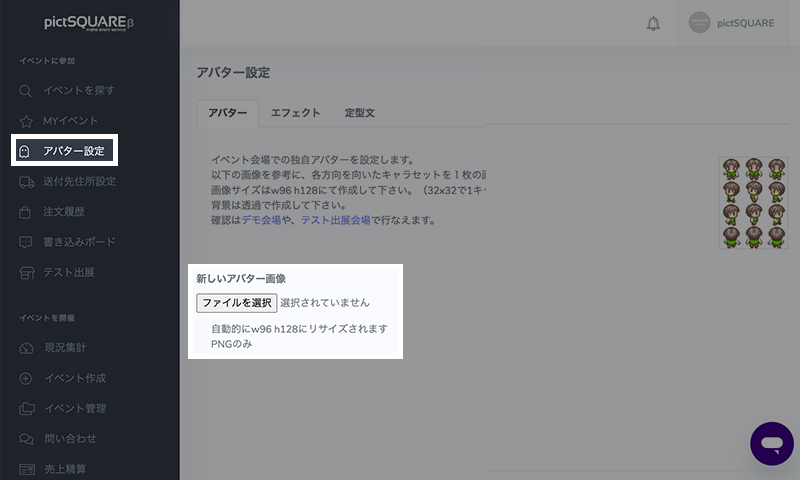
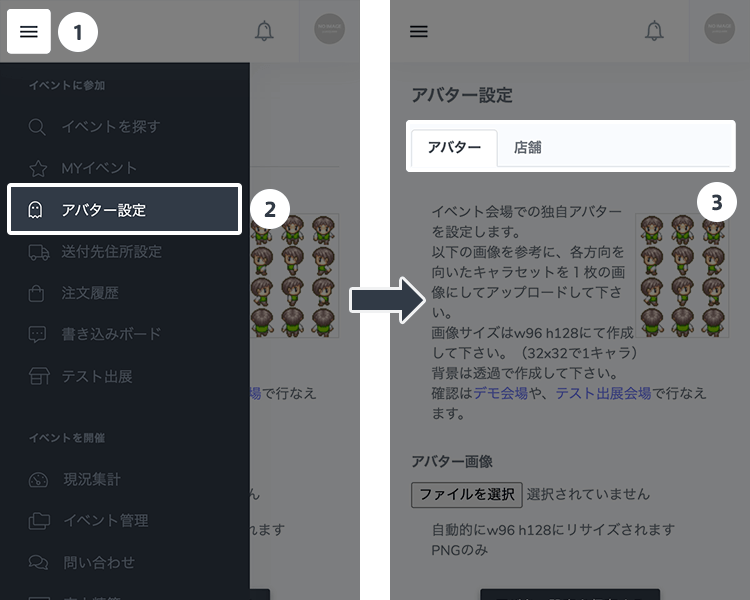 Avatar settings
To make a greater impression, create and set original avatars.
You can register up to 10 avatars. -
 Announcement
Check your Circle placement location from the "Circle Participation List" on the Event page, and announce it via SNS!
-
- STEP5 On the day of the Event
-
-
On the day of the Event, you can enter the venue from the Event page. Check Help for how to navigate etc.
-
 Check own store
Make sure your store properly appears.
You can change the setting during the Event, but please note that it will not be reflected on the other party in the store.In your own store, your name appears blue to others.
Store settings can be edited from MY Event > "Application details" of the applicable Event. -
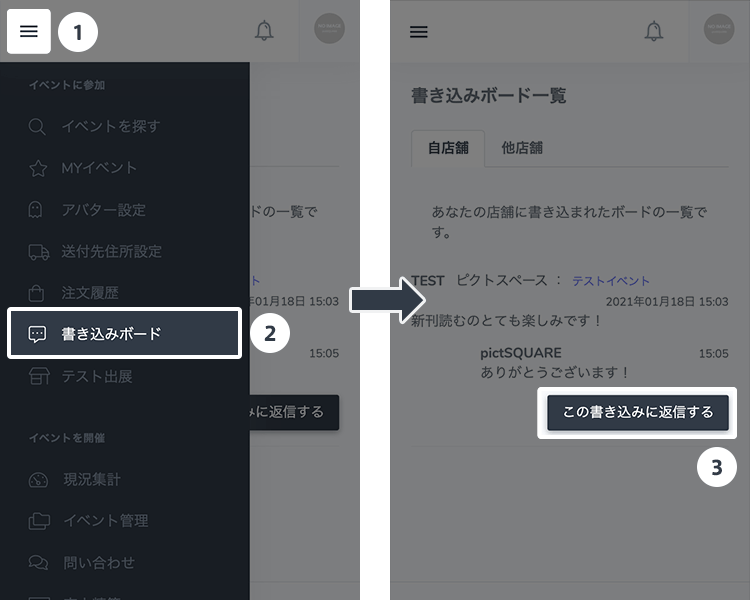
 Use of message boards (bulletin boards)
You can leave a message for the Circle owner on the message board. Messages can only be verified by the parties.
-
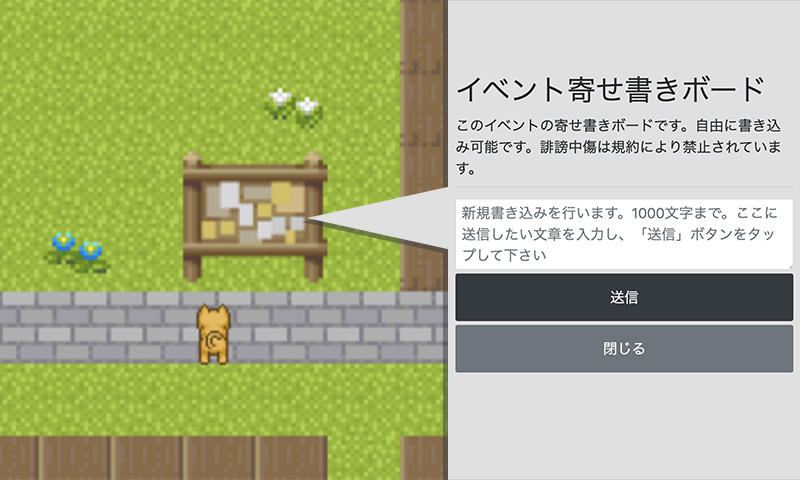 Use of the event message board.
It serves as a bulletin board for the entire event.
Please use it for messages and such.
If installed at the venue, anyone can write and view messages.Writing is only possible during the event opening hours. Purchase of Distributions
You can also purchase Distributions at other Circle space. Let's take a look around the Event hall! *It will be purchased online.
 End of Event
When the Event ends, you will not be able to purchase Distributions, write on message boards or re-enter the venue.
The message board can also be checked from the management screen after the Event.- STEP6 After the Event
-
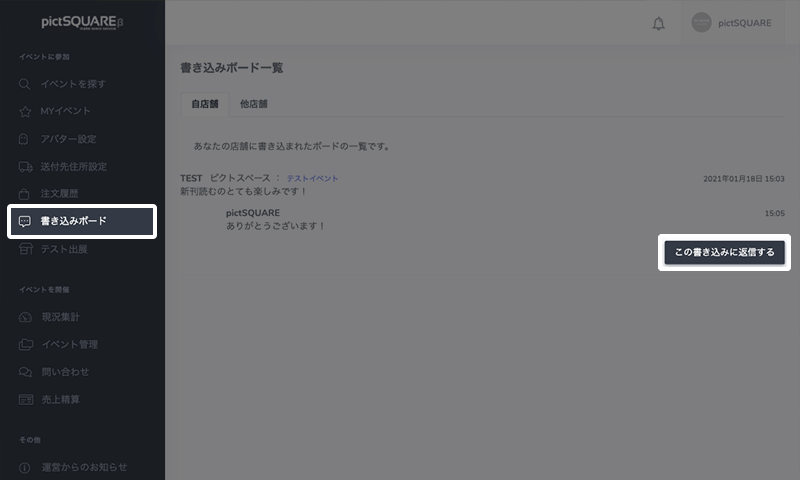
 Checking the message board
You can check the messages written for your store from the message board. You can reply after the Event, so reply as needed.
You can reply only to posts made to your own booth.
Replies are available for two weeks after the event ends.
Regarding Circle participation
Frequently Asked Questions- Can I cancel an Event that already has participation applications?
- Do I have to stay in my store during the Event?
- Can I put a description under the menu?
- I want to check the information about ordered Distributions.
- Is it possible to participate as a Circle in multiple Events held on the same day and at the same time?
- Can I add or change Distributions during the Event?
If you are interested in attending the Event and purchasing a Distribution, please check here.
General participation is currently free of charge for all Events.- STEP1 Membership registration
-
-
Entering membership information
To get started, create an account by entering the required information on the new member registration page.
In some events, general participation does not require membership registration. See here for details.
-
- STEP2 Look for Events
-
-
Find Events to attend
Head to "Find Events" on your dashboard to find the Events you want to participate.
Events can also be found on the front page of pictSQUARE.You can check your favorite Events later by adding to favorites. -
 If you have already decided on an Event to attend
If you have already decided the Event you want to attend based on information from SNS, etc., please check the Event details page directly.
-
 Learn more about Events
From the Event details page, check the date and time of the Event and the Circle participation list in advance.
-
- STEP3 Participate in an Event
-
-
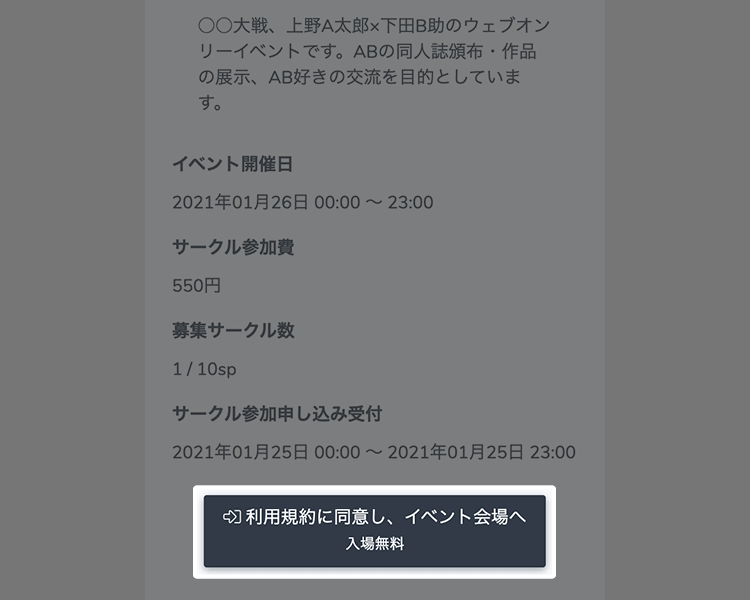
Enter the Event venue
On the date and time of the Event comes, you can enter the venue from the Event details page.
You can enter and exit as many times as you like at any time during the Event. -
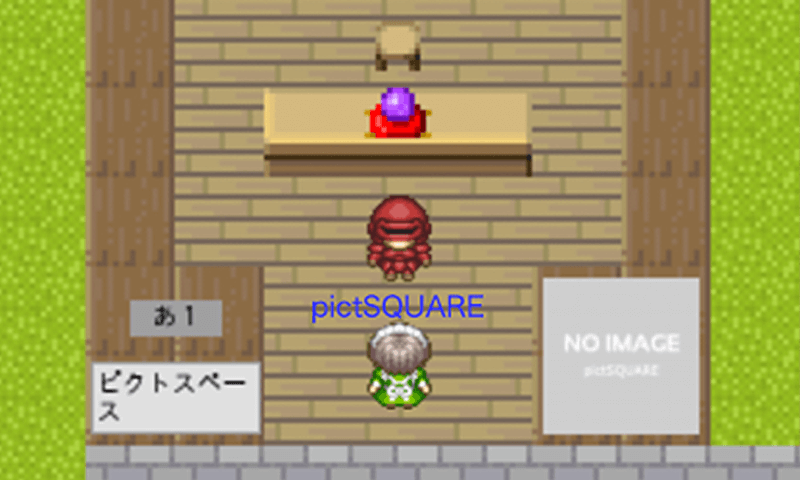
 Look around the hall
At the event venue, you can check menus at each circle (store) and make purchases and communicate about distributed items.
You can enjoy various features such as effects and avatar switching. -
Purchase of Distributions
You can also purchase Distributions at Circle space. Let's take a look around the Event hall! *It will be purchased online.
-
Use of message boards (bulletin boards)
You can leave a message addressed to the Circle owner on the message board. Messages can only be verified by the parties.
Replies can be made for 14 days after the event ends. -
Use of the event message board.
It serves as a bulletin board for the entire event.
Please use it for messages and such.
If installed at the venue, anyone can write and view messages.Writing is only possible during the event opening hours.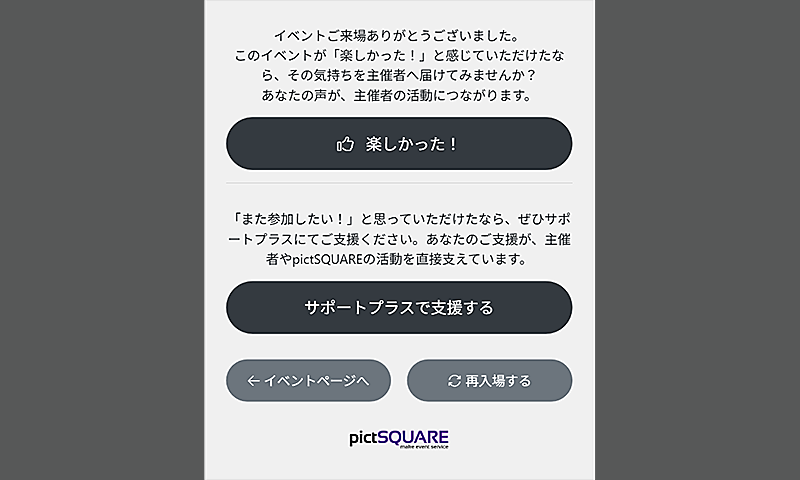
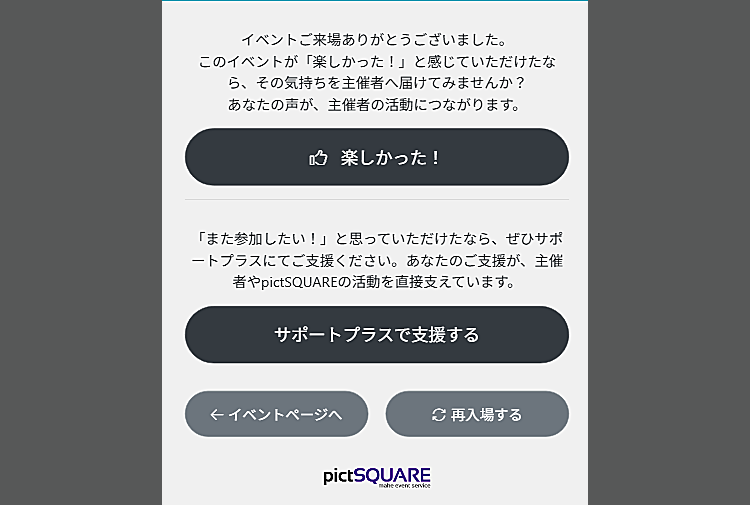 Share your thoughts about the event
When leaving the event venue, you can press the "That was fun!" button.
You can also send "Support Plus" donations to support the organizer.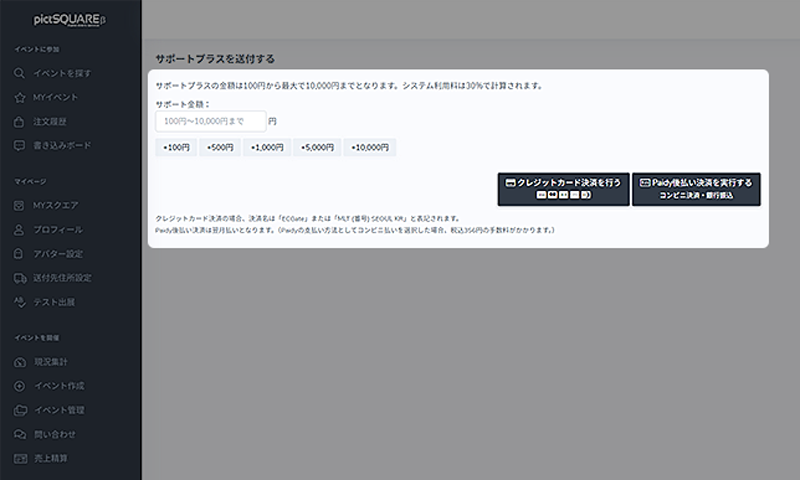
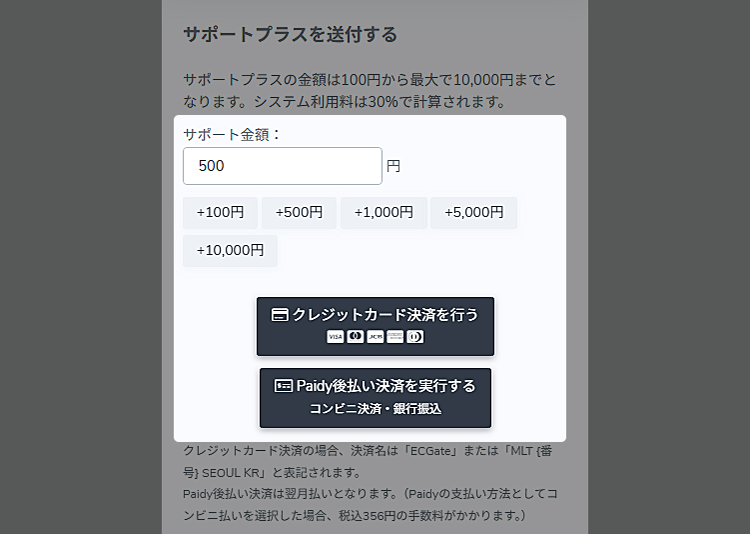 Pay for Support Plus
Support Plus donations start from 100 yen and can be paid by credit card or Paidy.
If the organizer declines Support Plus, your support will be used for pictSQUARE operating costs such as stronger security and support systems.End of EventAt the end of the Event, you will not be able to purchase Distributions, write on message boards or re-enter the venue. Purchased Distributions will be delivered by mail at a later date.
If you want to host a new Event, please check here.- STEP1 Membership registration
-
-
Entering membership information
To get started, create an account by entering the required information on the new member registration page.
-
- STEP2 Create an Event page
-
-
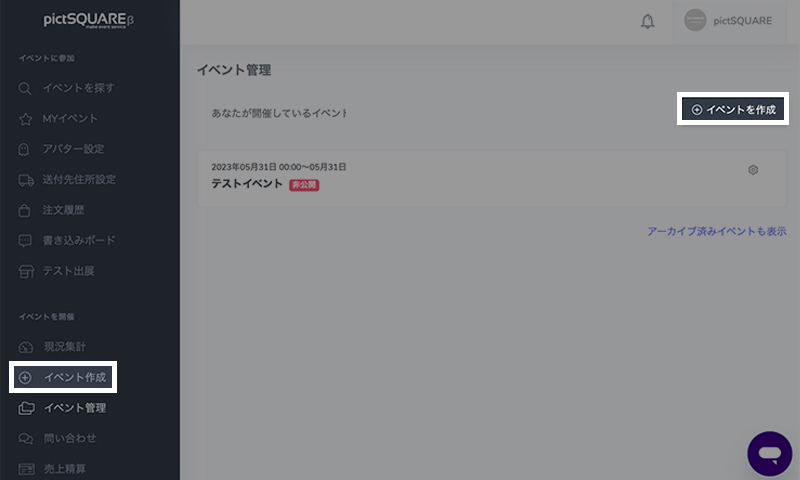
 Create a new Event
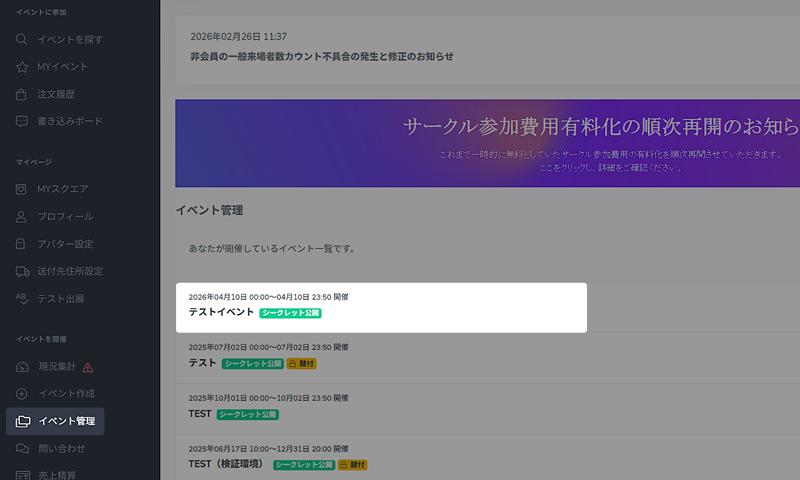
Press the "Create New" button from "Event Management" in the "Organize Event" category of the dashboard.
"Event Management" also includes information about Events you have hosted in the past. -
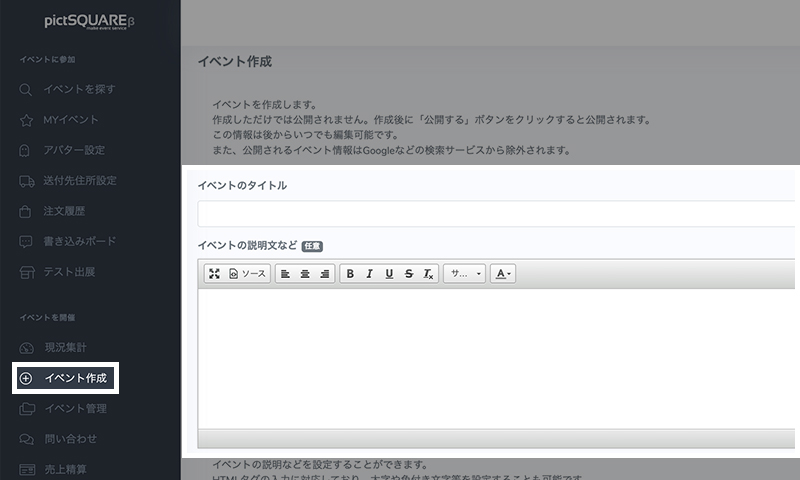
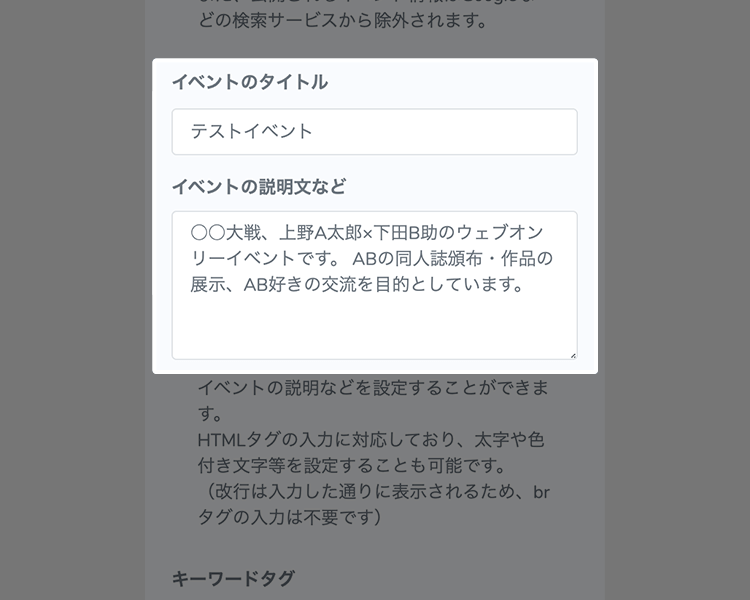 Enter the Event title and description
Enter the event title and description. The content can be changed later.
You can also use templates in the upper right corner of the event description to easily create the description. -
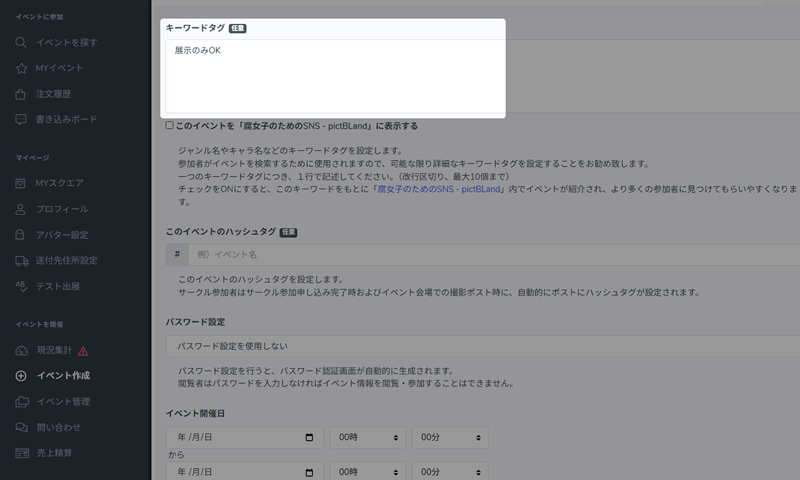
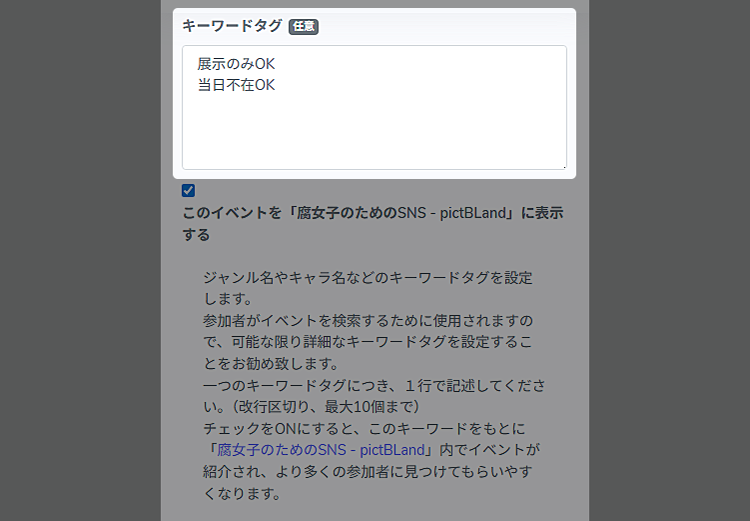 Set keyword tags
Set keyword tags such as genre and character names.
It's used by participants to search for Events, so we recommend setting keyword tags as detailed as possible.If you also set tags such as "OK with exhibition only" and "OK to be absence on the day" it will be easier for Circle participants to participate. -
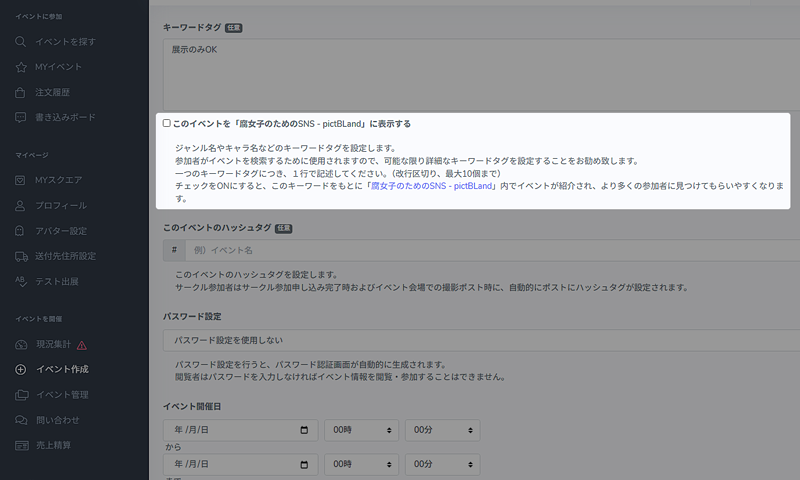
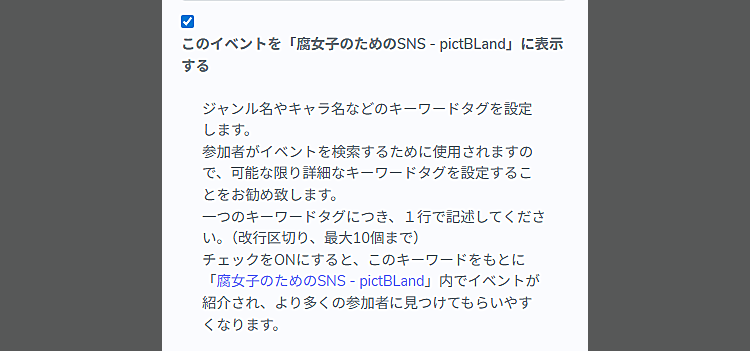 Choose whether to display the event on pictBLand
You can choose whether to display the event on pictBLand, pictSQUARE’s sister site.
-
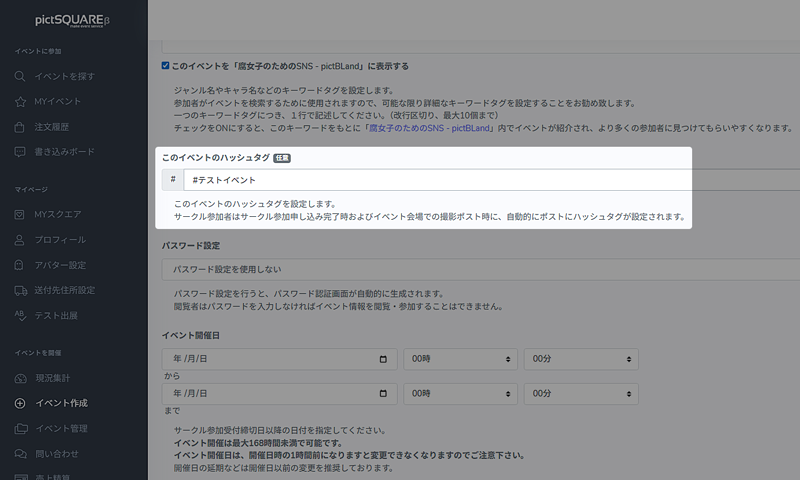
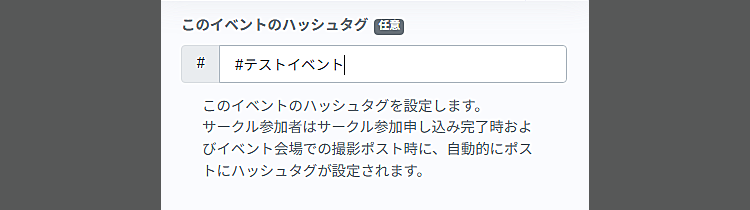 Set a hashtag
Set a hashtag for the event.
It will automatically be added to participants’ posts when they complete circle registration or post venue photos. -
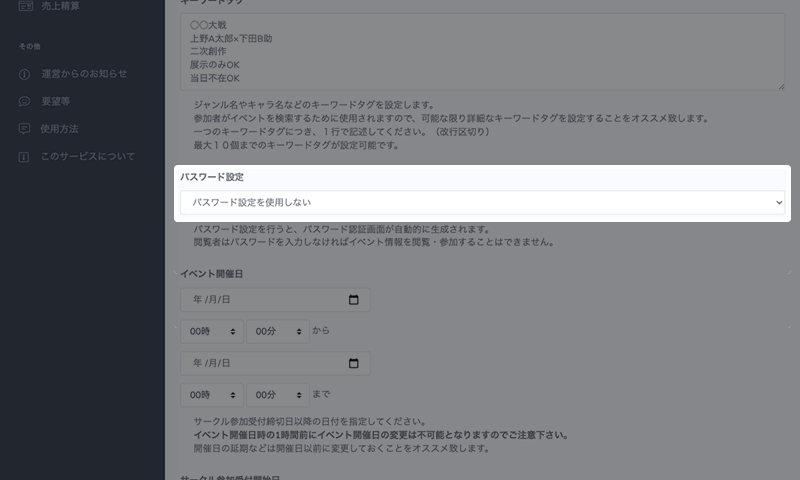
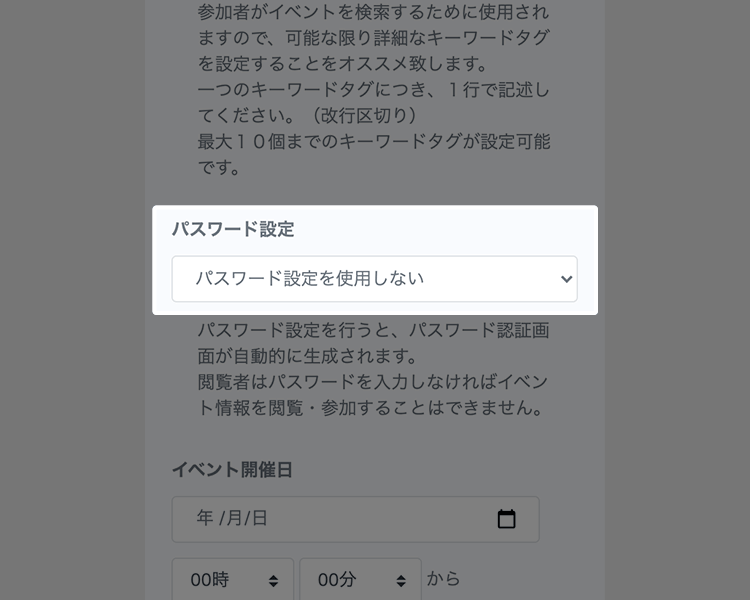 Decide whether to set a Password
When you set a Password, a Password authentication screen is automatically generated. Viewers must enter a Password to view the information or participate in the Event.
If no Password is set, all users can view the information or participate in the Event. -
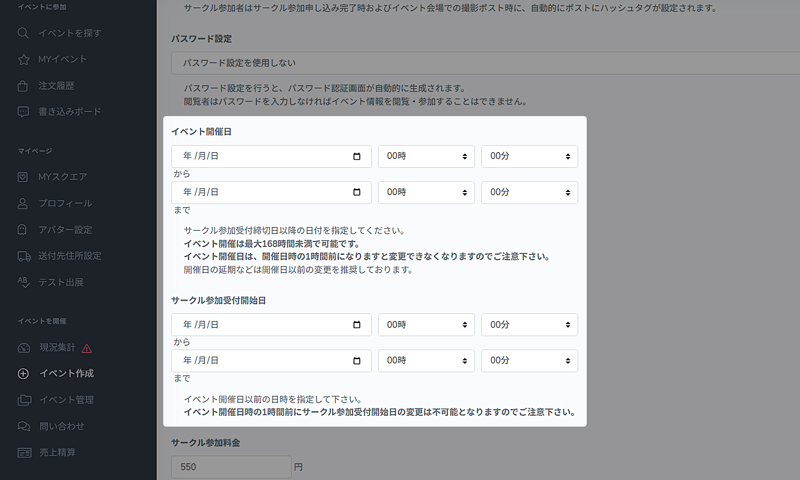
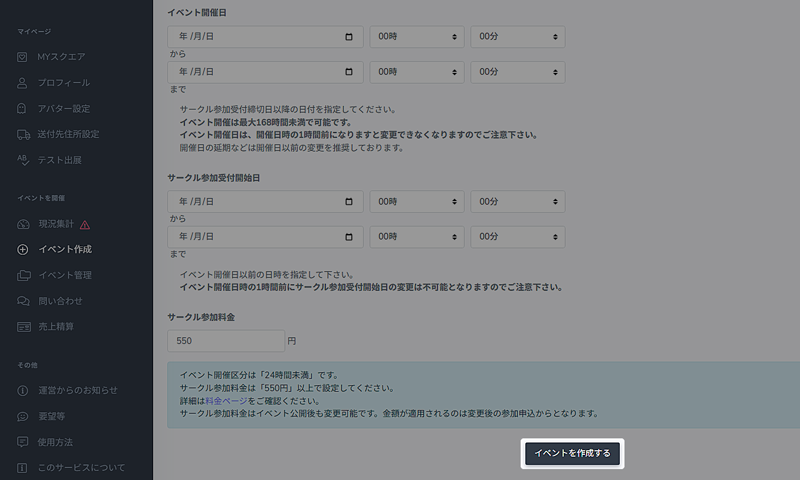
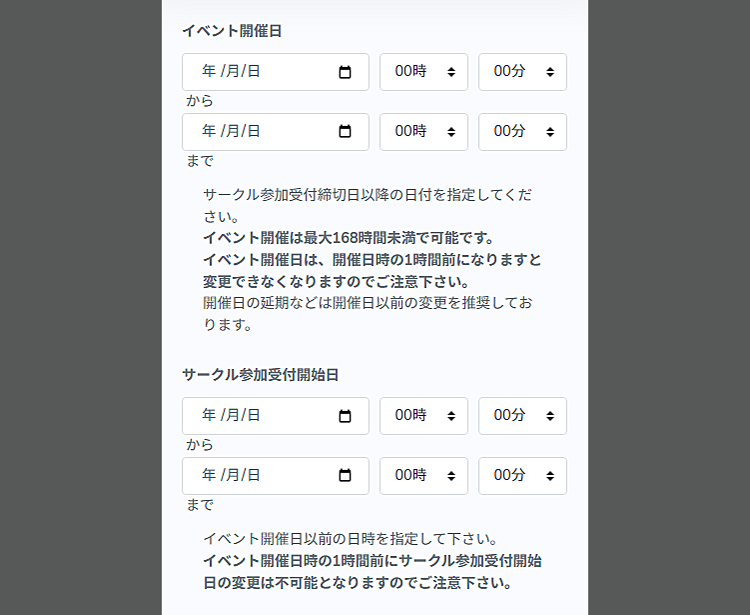 Set the date and time of the Event and the period to accept Circle participation
Enter the date and time of the Event. Please specify a date after the closing date for Circle participation.
Next, set the start date and the closing date for Circle participation applications. Acceptance will stop automatically on the closing date for accepting Circle participation.Events can be set to last up to 168 hours (7 days). -
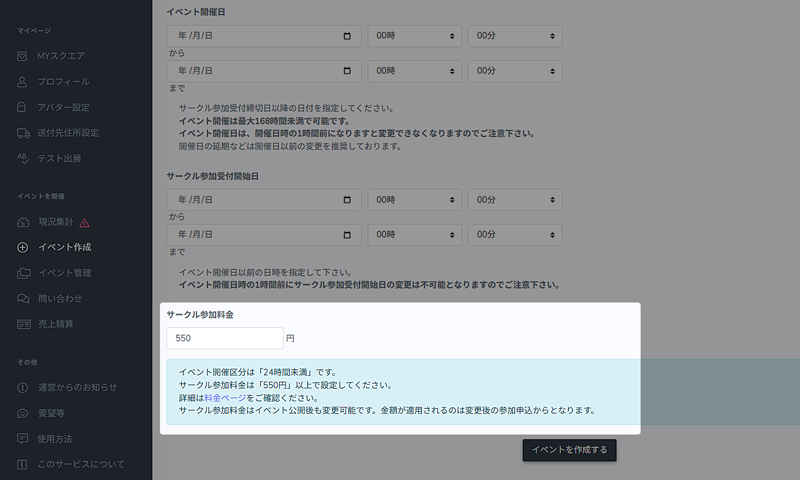
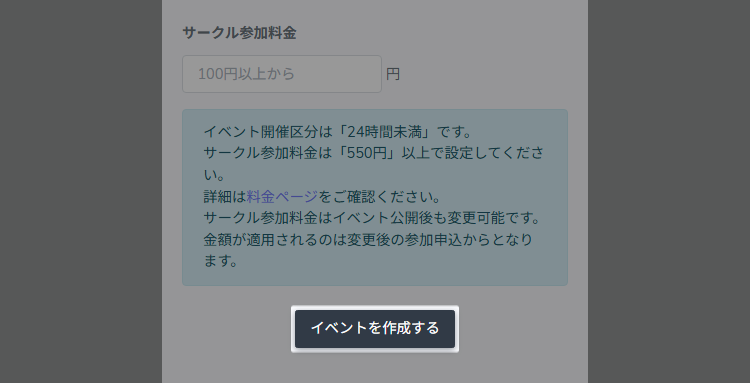
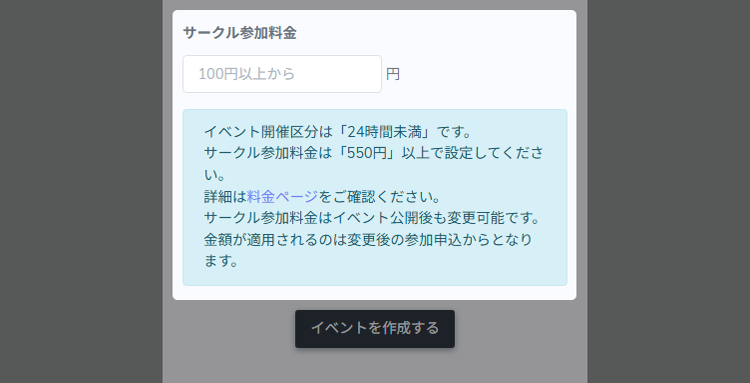 Set the circle participation fee
Set the fee for circle participation.
For each circle entry, a system fee is charged based on the event duration (under 24h: 550 yen, under 48h: 1000 yen, under 72h: 1350 yen, under 168h: 1800 yen) or 30% of the participation fee, whichever is higher.Example) If the Circle participation fee is 1,000 yen, the system usage fee is 550 yen as 30% of 1,000 yen is 300 yen. The total amount of the participation fee from all the Circles minus the system usage fee will be paid to the Organizer. -
 Click the "Create Event" button.
After entering the necessary information, click the "Create Event" button at the bottom to complete the process.
It's not open to the public at this time. -
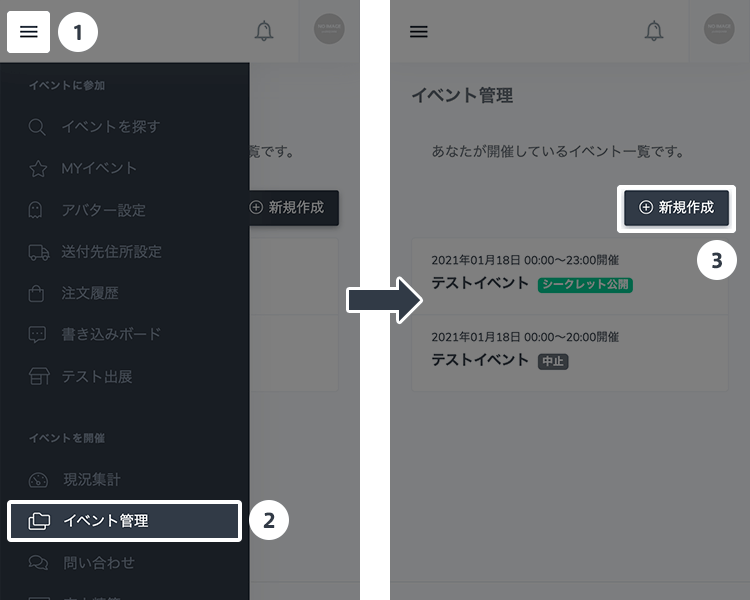
 Open the event management screen to change settings
Click the "Event Management" button under the dashboard’s "Host Event" category.
Then select and click the event you want to configure from the list. -
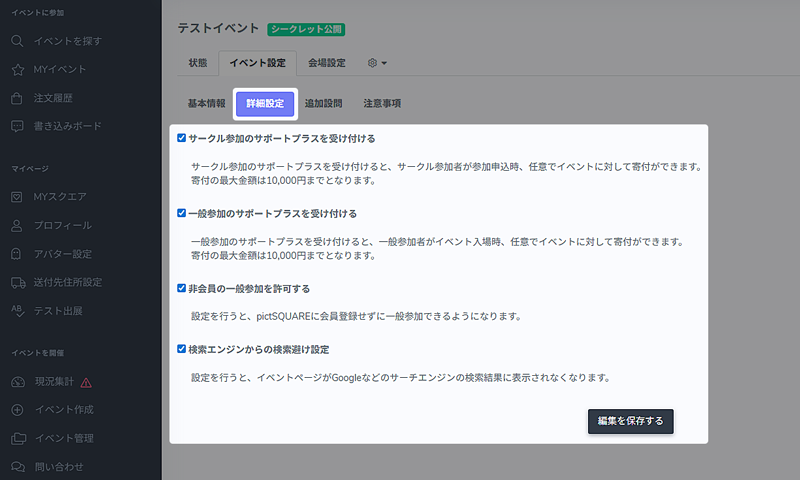
 Check the detailed settings
Select "Detailed Settings" from the "Event Settings" tab.
Here you can configure:
- Support Plus settings
- Whether non-members can enter as general attendees
- Search engine exclusion
-
- STEP3 Edit the event venue
-
-
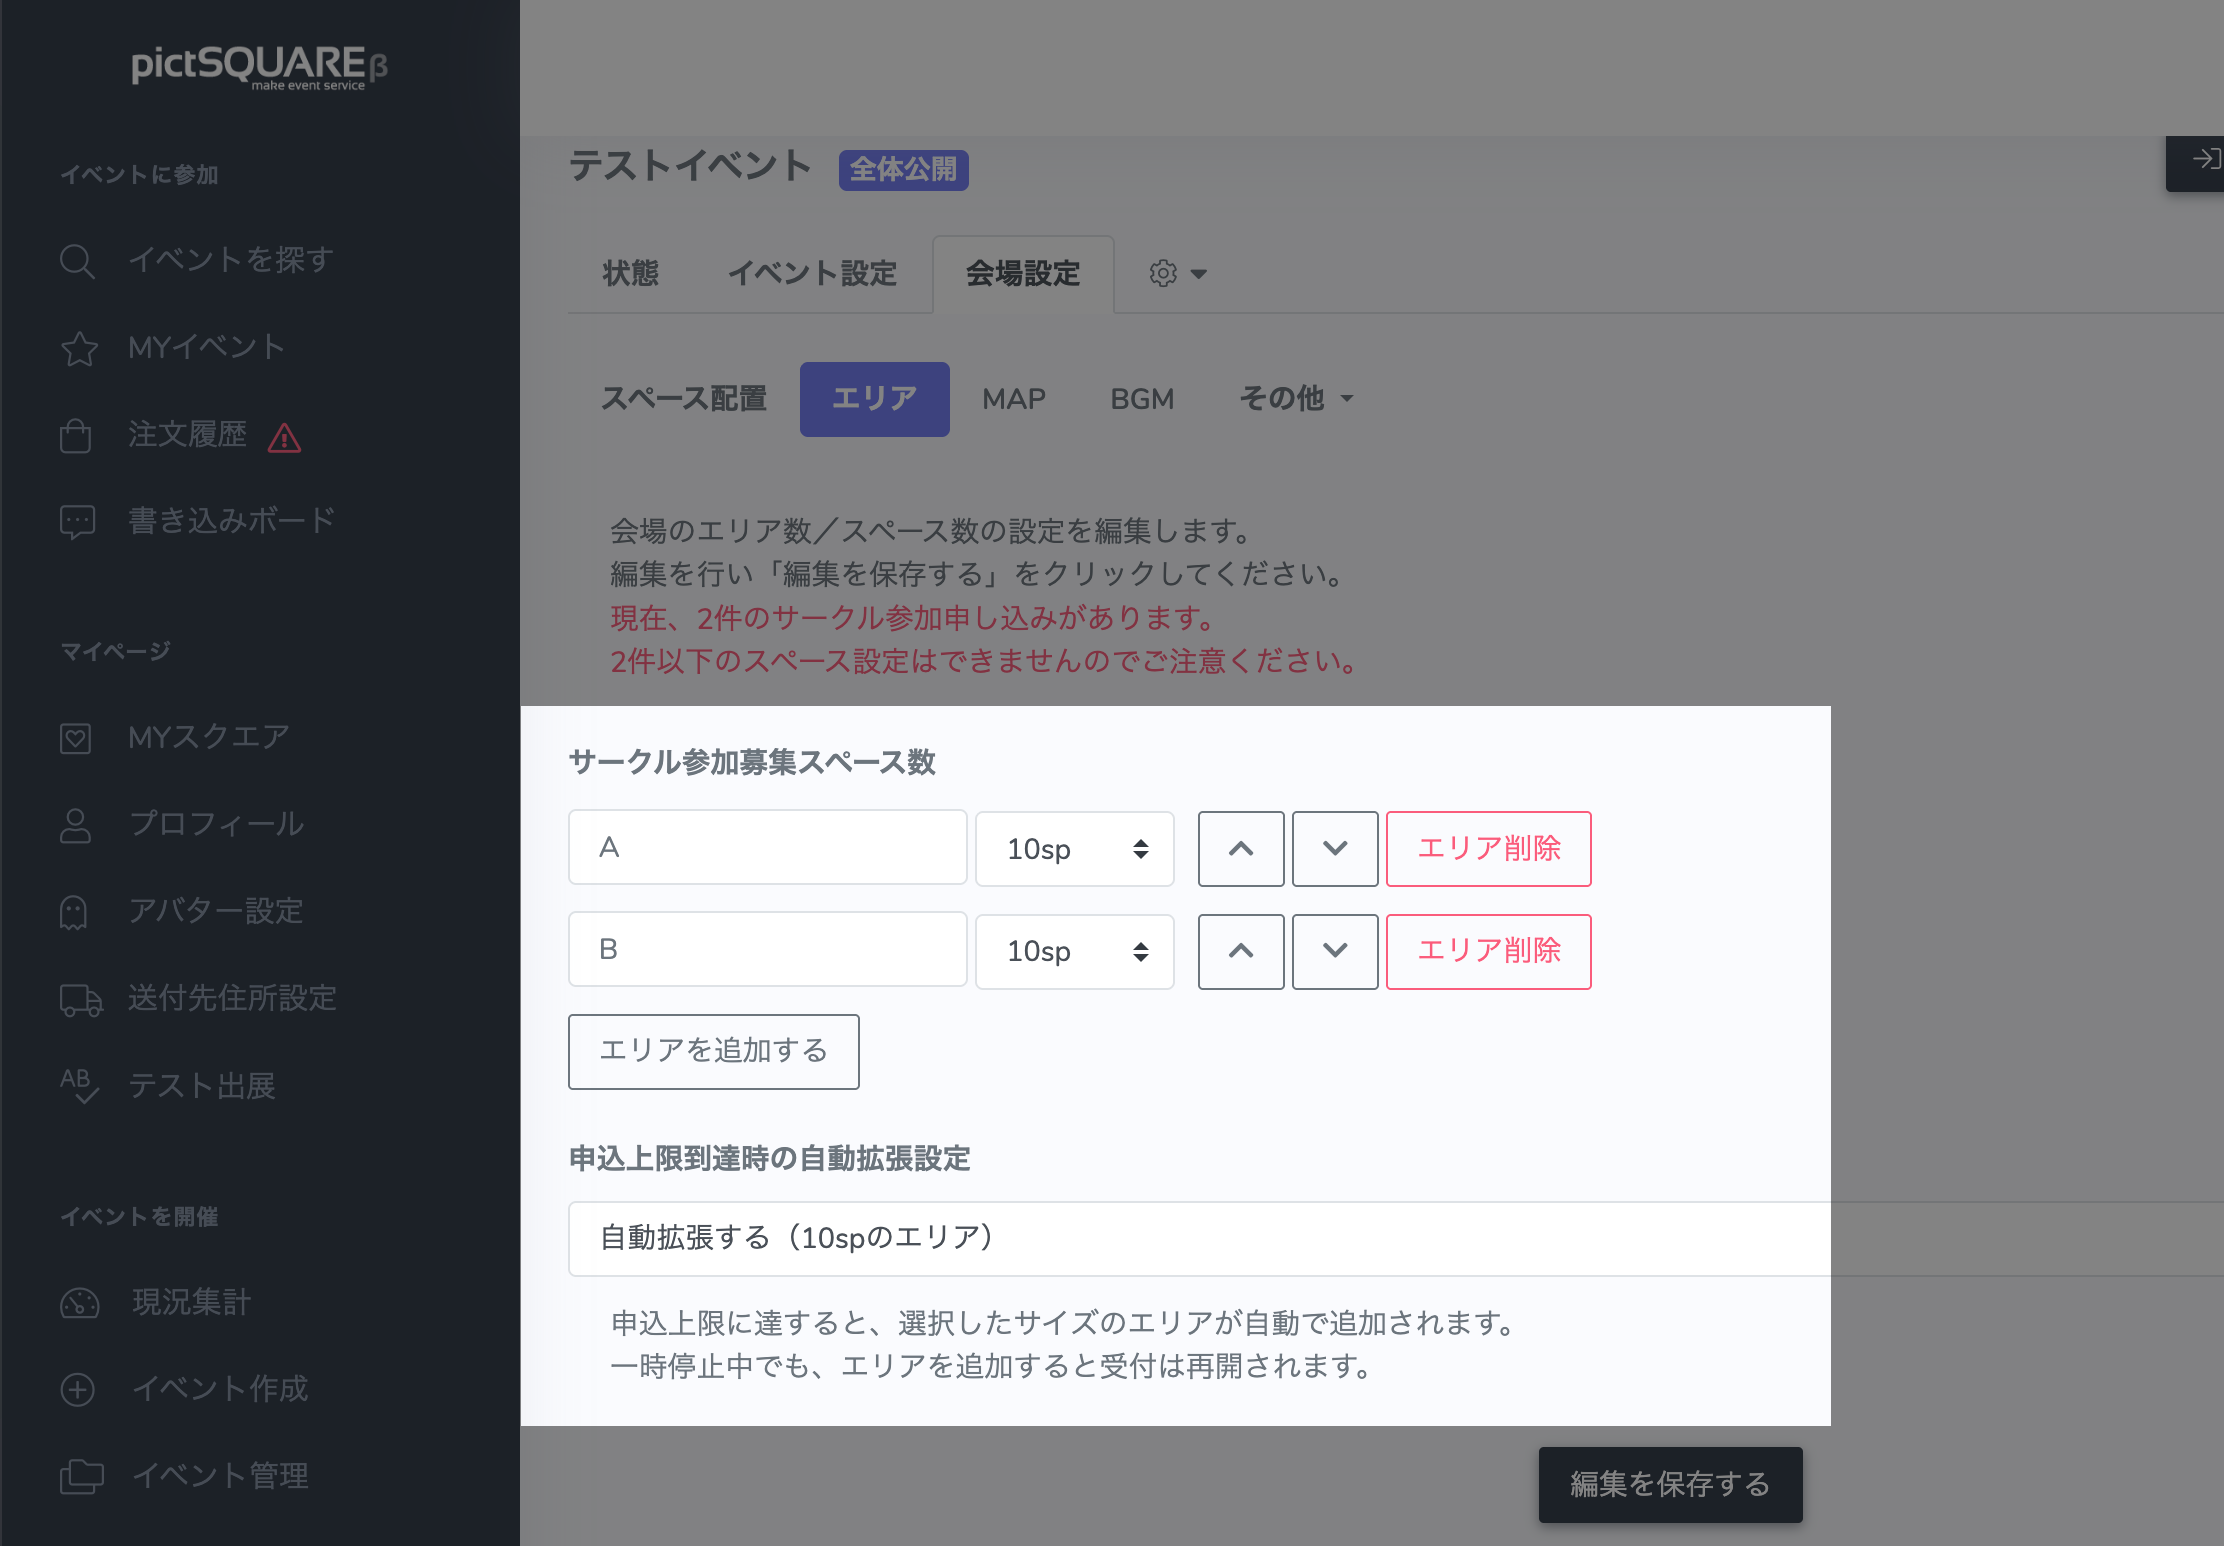
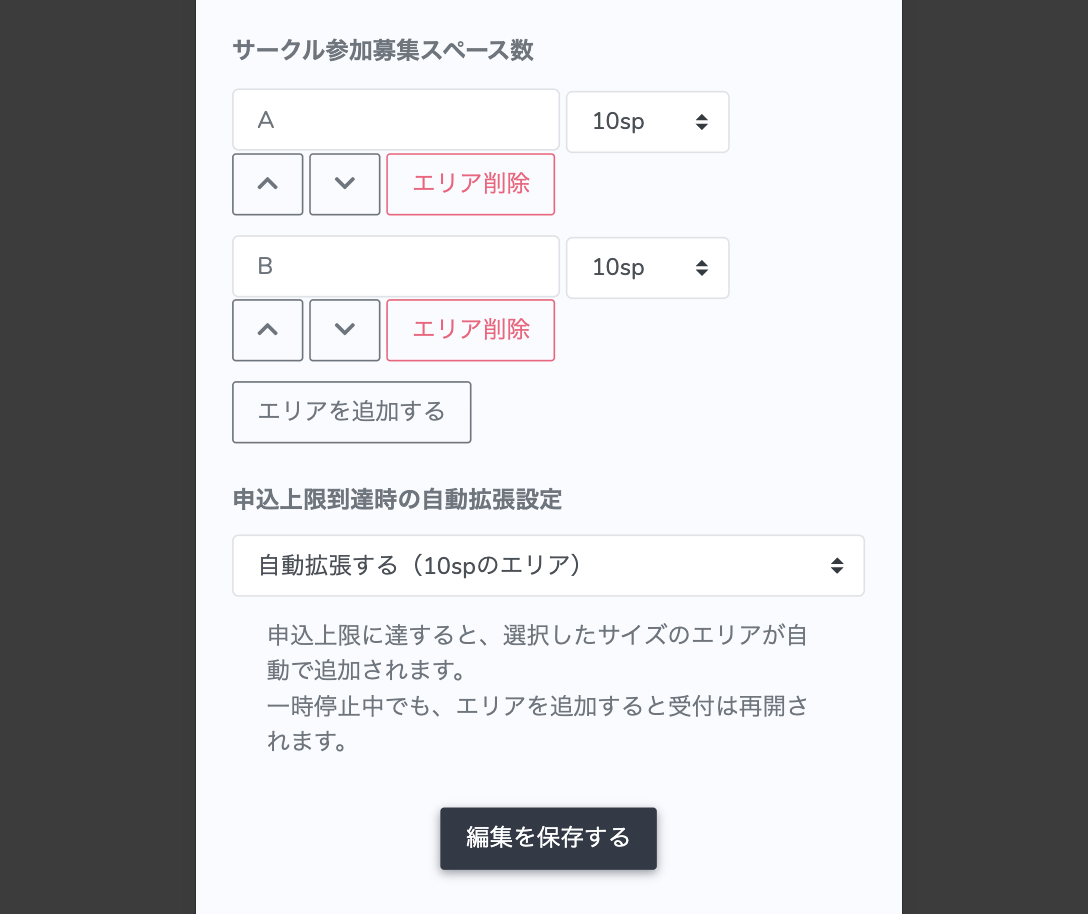 Decide areas and the number of spaces
Select "Area" from the "Venue Settings" tab.
You can place up to 100 spaces per area. If you split the venue into multiple areas, you can set the number of spaces for each area separately. (Max 100 spaces per area)
There is no limit to the number of areas you can create.If you use the auto-expansion setting at application limit, new areas can be added automatically when circle applications reach the limit.
-
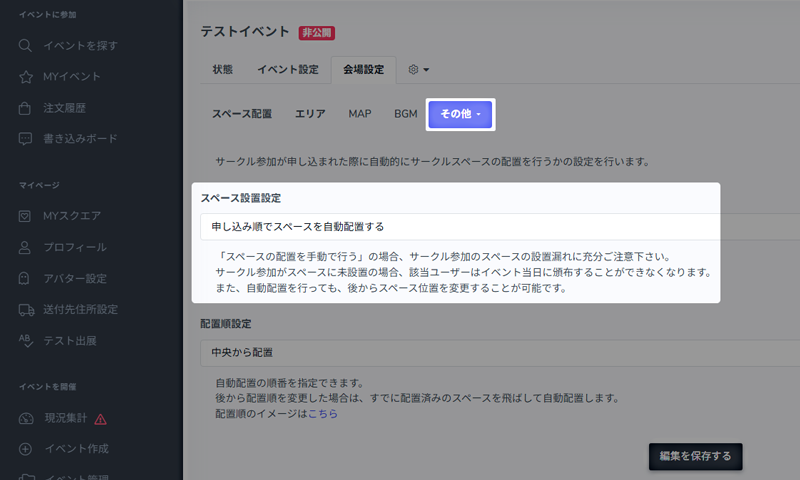
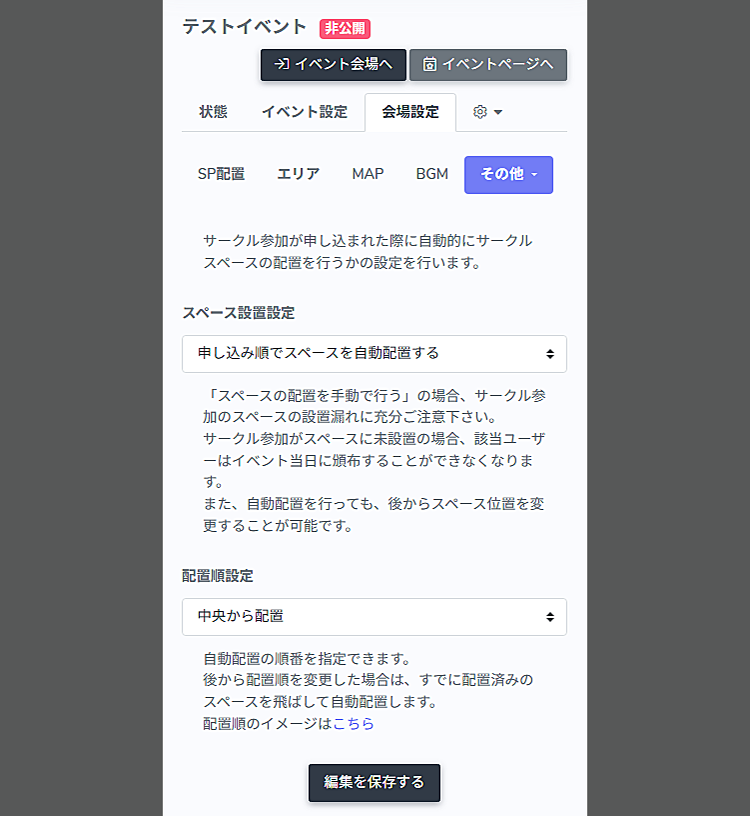 Choose space placement settings
Select "Auto Placement Settings" in the "Other" tab.
You can choose whether spaces are assigned automatically when circles apply, or manually by the organizer.
If you choose manual placement, make sure not to miss placing any participating circles.
If a circle is not assigned to a space, that user will not be able to distribute items on the event day.Even if you use auto placement, you can still change space positions later.
-
- STEP4 Publish and promote the event
-
-
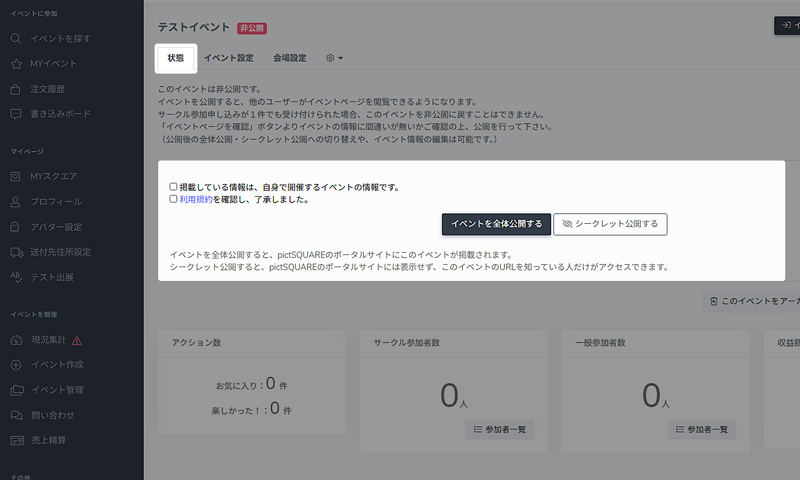
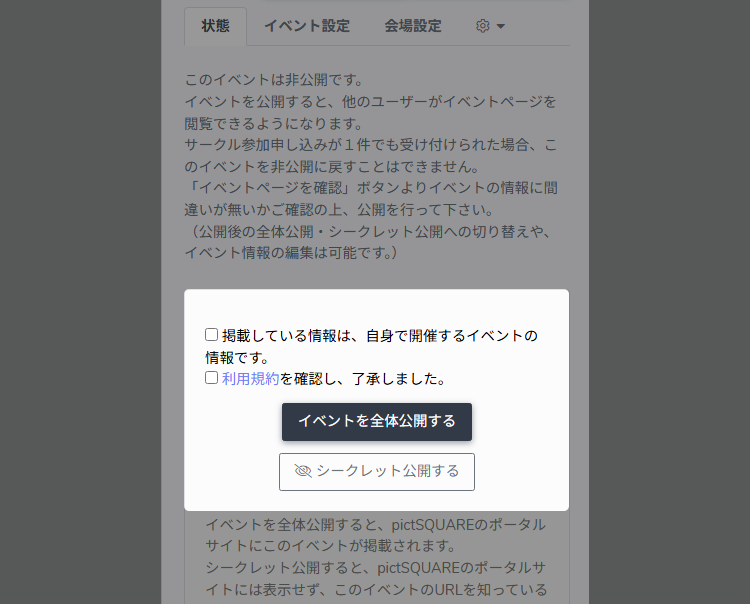 Find out how to publish an Event
Switch to the "Status" tab and check the confirmation box. Then choose either "Make event public" or "Make event secret."
If you make the event public, it will appear in pictSQUARE’s event list.
If you make it secret, it will not appear in the event list, and only people who know the event URL can access the page. -
Make an announcement about the Event
Once the Event page is published, make an announcement via SNS. If you have an image or illustration that symbolizes the Event, it will be more effective in attracting customers.
-
About organizing an Event
Frequently Asked Questions- If I want to exhibit at an Event hosted by myself, do I need to apply for Circle participation?
- Is there a charge?
- Can I change the number of spaces or areas at any time?
- Is there anything to do at pictSQUARE on the day of the Event?
- Is it possible to ban or deny certain users from an Event?
- I want to display my site's banner on the Event page
-
-
About pictSQUARE
The development of pictSQUARE began from the idea of holding a Doujin exhibition sale in a virtual space after Events being canceled or postponed due to the COVID-19.
It is currently available in beta and there are many shortcomings.
At pictSQUARE, we are committed to providing better services, and we believe we need to have a dialogue with everyone.
We have set up a window for direct communication between you and the administration via request forms, official X, etc.
We would appreciate it if you could share your thoughts and opinions.